

Sharing a technique after long time so without wasting time here we go
well most of the Photography peeps have slight focus issues at some images they are great but they had to dump it
so sharing this technique which i learned from this tutorial credit goes to Jeffrey Kontur
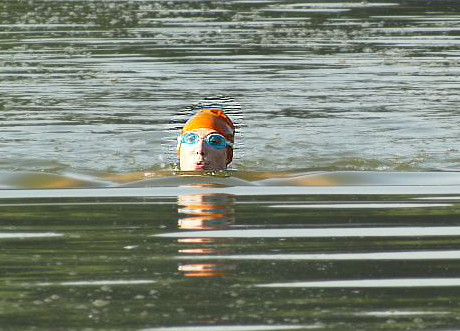
In this photo, the swimmer, who is obviously the focal point, is a bit soft. The greater the degree of the problem, the harder it's going to be to fix. This one should be relatively easy.
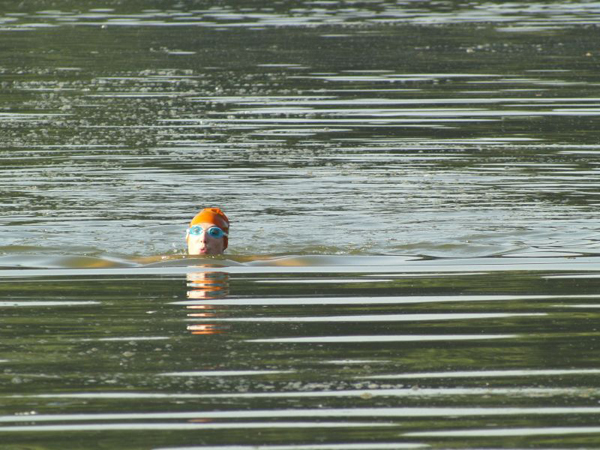
Out-of-Focus Swimmer
Lone swimmer
Fixing Non-Motion Based Blur
1. Open a Copy of Your Image
Start by opening a copy of the photo in Photoshop. Always work from a copy!
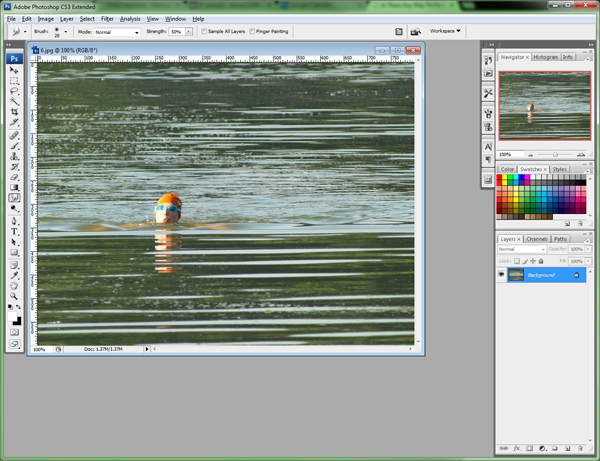
Open in Photoshop
2. Duplicate the Background Layer
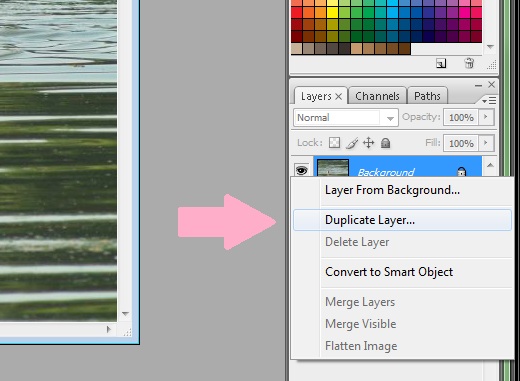
Carrying the idea of working from a copy one step further, right-click (or Cmd-Click) the Background layer on the layers palette.
Select "Duplicate Layer" from the pop-up menu.
Duplicate the layer
3. Rename the Layer
By default, Photoshop will name this new layer "Background copy," but you have the option to rename it as anything. To keep things straight in this tutorial, I've renamed mine "Working Layer" since this is the layer we'll be working on.
Giving your layers meaningful names will be a lifesaver when you get into more complex edits where you may have many layers, each for a different type of edit or to edit a different portion of your photo. For instance, I might have named this layer "swimmer" if I were also going to have a layer where I edited the "water." Having them named makes it much easier to keep everything straight.
Click OK to create the layer.
Name the duplicate layer

4. A Little About Layers
Now all the modifications we make will be on this working layer.
Think of layers like transparent sheets laid down over top of your photo. That's a slightly imperfect analogy, but it works for right now. So we just laid down a transparent sheet and we can scribble and write all over that sheet. When we look, we see what we've written, plus the original photo underneath. If we don't like what we've written, we can throw away the sheet and the original photo is unharmed.
The layer that is highlighted is the one where all our edits will be made so make sure the working layer is highlighted. In my system, the active layer is highlighted in blue.
Active layer
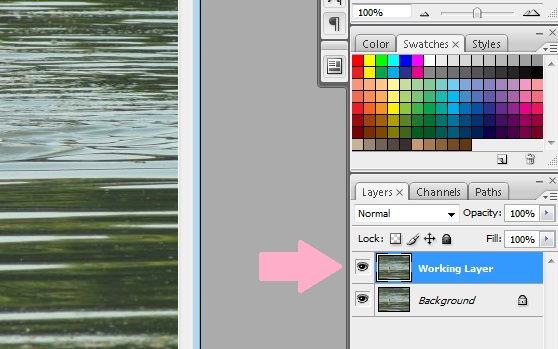
Active layer, highlighted in blue
In case you're wondering, the little eyeball next to each layer indicates whether or not that layer is visible on the screen. Click it and the eyeball goes away and that layer becomes invisible. You cannot make edits to invisible layers. Click it again and the eyeball returns.
5. Pick the Lasso Tool
Now let's use the lasso tool to trace the outline of the area you want to fix. If the area is sharply defined and has strong contrast from its surroundings, you can use the magnetic lasso instead. Use the polygonal lasso tool only if the area you want to select is made up entirely of straight lines such as a rectangle, triangle, etc.
To select any of the lasso tools, click and hold on whichever tool is currently showing in the lasso position. This will bring up a flyout toolbar where you can pick the type of lasso you want.
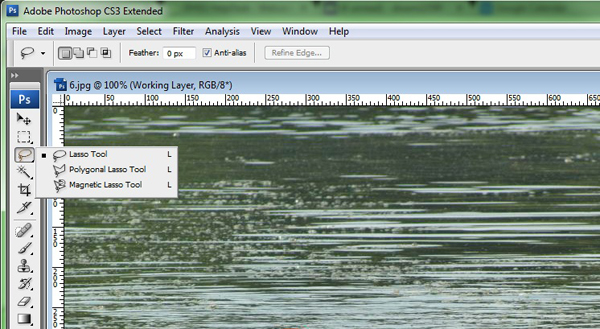
Toolbar Flyout
Choose a lasso tool
6. Select the Area to be Sharpened
With the lasso tool (or magnetic lasso tool) selected, trace around the area you want to fix. You do this by clicking and holding the mouse button while dragging your mouse cursor to draw an outline. Release the mouse button when you're back at the beginning.
Your selection should be close, as shown here, but don't get hung up on it being perfectly precise.
Lasso Tool
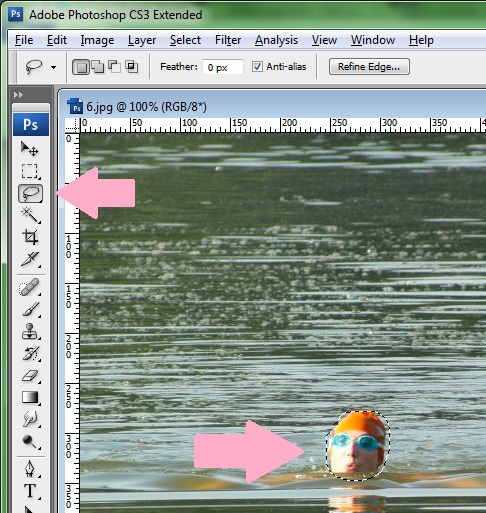
Draw a lasso around the portion you want to edit
7. Feather your Selection Area Borders
Click Select > Modify > Feather...
Feathering will make the outline around your selection area "fuzzy". It won't appear that way on screen but the effect can be seen once we start making modifications to the photo.
Feather
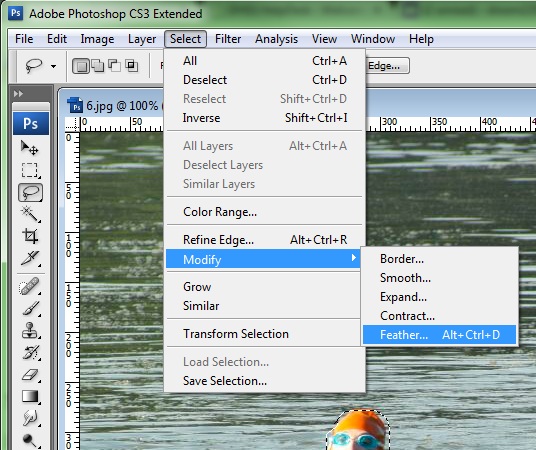
Feather your borders
8. Using Feathering
The benefit of feathering is that it softens the transition and makes your edits blend in.
The image below demonstrates how your edits might look if you didn't feather the selection area. This is just a single edit with no attempt to blend it.
Harsh transition
Harsh edits (without feathering the borders)
There are no hard-and-fast rules for how much to feather. The guideline is the more subtle your edits, the lower number of pixels you can use. Of course the more extreme your edits, the larger number of pixels you'll want for a transition area.
A good rule of thumb is 3-5 pixels. (The most I have ever used is 9 pixels and that is very extreme.) If you feather too much, you may actually introduce softness into a large area of your picture.
Predicting how extensive your edits will be is something that comes with experience. The good news is, you can experiment. After all, Photoshop comes with multiple levels of "Undo." You are working on a disposable layer and only from a copy of your original photo. So you can always go back if you try something and it doesn't work out.
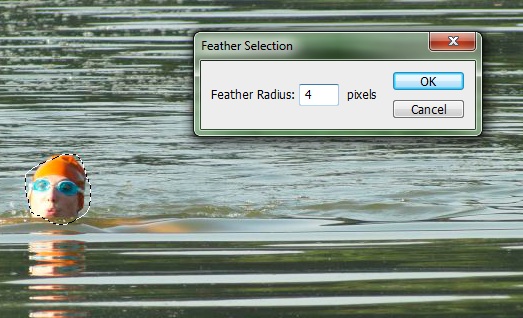
Select transition area
Choose how many pixels to feather
9. Apply Smart Sharpen
The old saying, "there's more than one way to skin a cat" is especially true with Photoshop. There are multiple ways to do practically everything. Not all of them will yield identical results, but they will generally yield similar results.
With that in mind, I will show you just one way to sharpen up a blurry area that is soft because of focus or diffraction problems.
Click Filter > Sharpen > Smart Sharpen.
It is a common misconception among Photoshop users that smart filters can only be used with smart objects or smart layers. This is not true and I happen to like how Smart Sharpen works.
Select smart sharpen
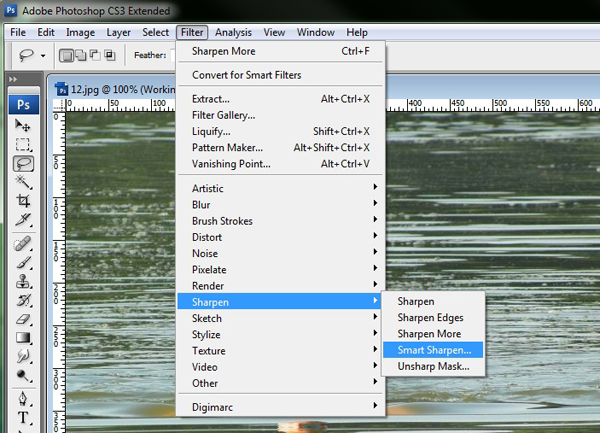
Just one of many ways to sharpen an image
10. Preview your Edits
When the dialog box comes up, make sure the "preview" checkbox is checked. This will let you see your changes as you make them. This is especially important because you will have to make your changes "by eye." That is, you adjust the sliders and watch to see how it looks in your picture.
Smart sharpen preview
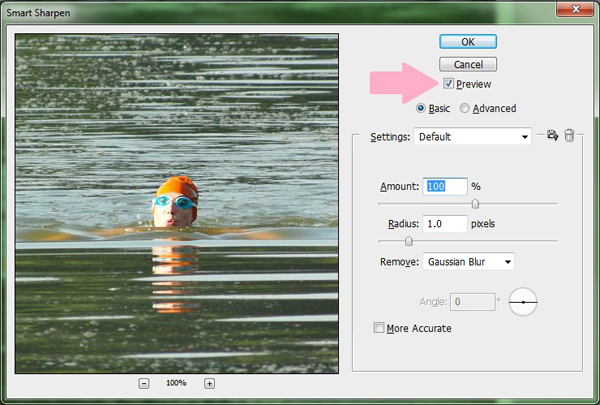
Set preview so you can see your edits
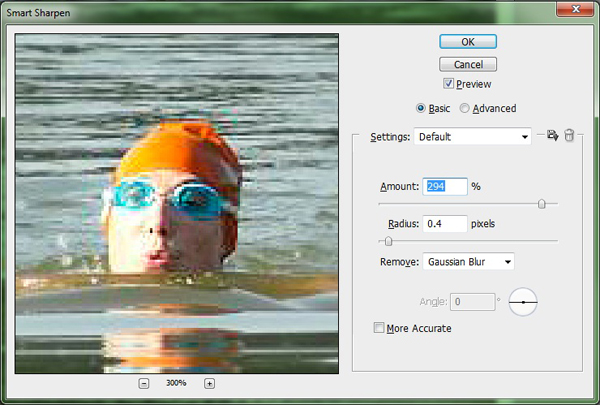
11. Understanding Smart Sharpen's Options and Controls
I can only give guidelines for making the adjustments because every picture is different.
One useful technique when making adjustments by eye is to temporarily set the "Amount" slider up well above 150%. You want something way more extreme than you will actually use in your final edit.
Now when you adjust the "Radius" slider, you can more easily see the differences in the preview window. In general, I like to keep the pixel radius small. Rarely will you ever want to go above 2 pixels and most often it will be less than 1 pixel.
Here, I settled on 0.4 pixels. This decision was based on just looking at the preview.
One quick note about the "Remove" drop-down. It has only three options, each covering a different type of blur. Go ahead and try out each of the settings and look at the effect in the preview pane.
Gaussian blur generally refers to focus problems or an all-over fuzziness.
Lens blur is mainly for diffraction or softness caused by low quality lenses or filters.
Motion blur is for camera or subject movement and also activates the "Angle" control so you can tell Photoshop the direction of the blur.
Also note that the affect is applied only within the bounds of your selection area. That's the whole purpose of defining a selection area!
Adjusting the radius
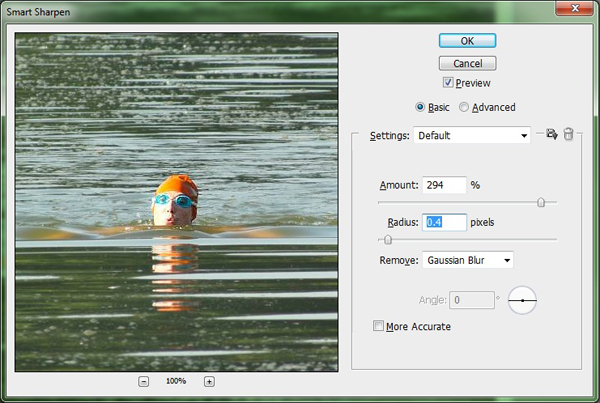
A neat trick for previewing the radius setting
12. Finalize the Amount of Sharpening
Now with your radius selected, you can back off on the "Amount" slider until you get a more realistic effect.
It can be useful here to zoom in on your preview picture. Even if you can't see the entire selection area, you can "grab" the picture and move it around by clicking and dragging. Look at important details like eyes to get a very close up view of the effect of your edits.
You generally don't want to zoom in to more than 300%-400%. Even at this level, the image may show obvious pixelation.
Zooming in on the preview
Pixellation at extreme zoom
13. Double-Check the Result
As you back off the slider, you should see the results in the preview pane. You'll also be able to see the transition area where you feathered the selection.
If the transition does not look smooth enough, cancel the operation and go back to step 7.
If the pixelation is extreme in your preview, back off the zoom to get a better sense of the effect. When you're happy with it, click OK to apply your changes.
Now to compare the before and after!
By repeatedly clicking the eyeball icon next to your working layer, you can switch that layer off and on. This will let you see the results before and after your edits.
In this example, the swimmer was only slightly soft. More extreme examples or more extreme edits may yield more obvious results, but they will also be correspondingly hard to make appear natural.
Before and After

Compare the before and after
14. Flatten the Image
You can save your edited photo at any step along the way, but to actually use it for most purposes, you'll probably have to put it into a universal format. JPG and PNG are two very common universal formats. The thing with both of them is they do not support images with multiple layers.
So before you can save, you'll have to combine the layers into one. This is called "Flattening" the image.
To flatten your image, right-click (or Cmd-click) on one of the layers. Be warned that certain types of layers (there are many types of layers not covered in this tutorial) will not present you with a flatten option. Right-clicking on the Background layer is always a safe bet.
From the menu that pops up, select "Flatten Image". It's always the very last option.
Flatten Image
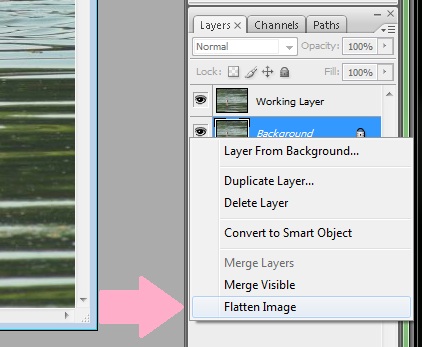
Flatten image
15. Save the Final File
You'll notice as soon as you flatten the image that all your layers instantly disappear, but all your edits are still intact. They are now part of the base image.
Now you can click File > Save (or File > Save As...) and then close your newly-sharpened image.
Hope its helpful for everyone over here if you couldn't get some part tag me will tell you how to do it
Original Source :
well most of the Photography peeps have slight focus issues at some images they are great but they had to dump it
so sharing this technique which i learned from this tutorial credit goes to Jeffrey Kontur
FIXING BLURRY PHOTOS
In this photo, the swimmer, who is obviously the focal point, is a bit soft. The greater the degree of the problem, the harder it's going to be to fix. This one should be relatively easy.
Out-of-Focus Swimmer
Lone swimmer
Fixing Non-Motion Based Blur
1. Open a Copy of Your Image
Start by opening a copy of the photo in Photoshop. Always work from a copy!
Open in Photoshop
2. Duplicate the Background Layer
Carrying the idea of working from a copy one step further, right-click (or Cmd-Click) the Background layer on the layers palette.
Select "Duplicate Layer" from the pop-up menu.
Duplicate the layer
3. Rename the Layer
By default, Photoshop will name this new layer "Background copy," but you have the option to rename it as anything. To keep things straight in this tutorial, I've renamed mine "Working Layer" since this is the layer we'll be working on.
Giving your layers meaningful names will be a lifesaver when you get into more complex edits where you may have many layers, each for a different type of edit or to edit a different portion of your photo. For instance, I might have named this layer "swimmer" if I were also going to have a layer where I edited the "water." Having them named makes it much easier to keep everything straight.
Click OK to create the layer.
Name the duplicate layer
4. A Little About Layers
Now all the modifications we make will be on this working layer.
Think of layers like transparent sheets laid down over top of your photo. That's a slightly imperfect analogy, but it works for right now. So we just laid down a transparent sheet and we can scribble and write all over that sheet. When we look, we see what we've written, plus the original photo underneath. If we don't like what we've written, we can throw away the sheet and the original photo is unharmed.
The layer that is highlighted is the one where all our edits will be made so make sure the working layer is highlighted. In my system, the active layer is highlighted in blue.
Active layer
Active layer, highlighted in blue
In case you're wondering, the little eyeball next to each layer indicates whether or not that layer is visible on the screen. Click it and the eyeball goes away and that layer becomes invisible. You cannot make edits to invisible layers. Click it again and the eyeball returns.
5. Pick the Lasso Tool
Now let's use the lasso tool to trace the outline of the area you want to fix. If the area is sharply defined and has strong contrast from its surroundings, you can use the magnetic lasso instead. Use the polygonal lasso tool only if the area you want to select is made up entirely of straight lines such as a rectangle, triangle, etc.
To select any of the lasso tools, click and hold on whichever tool is currently showing in the lasso position. This will bring up a flyout toolbar where you can pick the type of lasso you want.
Toolbar Flyout
Choose a lasso tool
6. Select the Area to be Sharpened
With the lasso tool (or magnetic lasso tool) selected, trace around the area you want to fix. You do this by clicking and holding the mouse button while dragging your mouse cursor to draw an outline. Release the mouse button when you're back at the beginning.
Your selection should be close, as shown here, but don't get hung up on it being perfectly precise.
Lasso Tool
Draw a lasso around the portion you want to edit
7. Feather your Selection Area Borders
Click Select > Modify > Feather...
Feathering will make the outline around your selection area "fuzzy". It won't appear that way on screen but the effect can be seen once we start making modifications to the photo.
Feather
Feather your borders
8. Using Feathering
The benefit of feathering is that it softens the transition and makes your edits blend in.
The image below demonstrates how your edits might look if you didn't feather the selection area. This is just a single edit with no attempt to blend it.
Harsh transition
Harsh edits (without feathering the borders)
There are no hard-and-fast rules for how much to feather. The guideline is the more subtle your edits, the lower number of pixels you can use. Of course the more extreme your edits, the larger number of pixels you'll want for a transition area.
A good rule of thumb is 3-5 pixels. (The most I have ever used is 9 pixels and that is very extreme.) If you feather too much, you may actually introduce softness into a large area of your picture.
Predicting how extensive your edits will be is something that comes with experience. The good news is, you can experiment. After all, Photoshop comes with multiple levels of "Undo." You are working on a disposable layer and only from a copy of your original photo. So you can always go back if you try something and it doesn't work out.
Select transition area
Choose how many pixels to feather
9. Apply Smart Sharpen
The old saying, "there's more than one way to skin a cat" is especially true with Photoshop. There are multiple ways to do practically everything. Not all of them will yield identical results, but they will generally yield similar results.
With that in mind, I will show you just one way to sharpen up a blurry area that is soft because of focus or diffraction problems.
Click Filter > Sharpen > Smart Sharpen.
It is a common misconception among Photoshop users that smart filters can only be used with smart objects or smart layers. This is not true and I happen to like how Smart Sharpen works.
Select smart sharpen
Just one of many ways to sharpen an image
10. Preview your Edits
When the dialog box comes up, make sure the "preview" checkbox is checked. This will let you see your changes as you make them. This is especially important because you will have to make your changes "by eye." That is, you adjust the sliders and watch to see how it looks in your picture.
Smart sharpen preview
Set preview so you can see your edits
11. Understanding Smart Sharpen's Options and Controls
I can only give guidelines for making the adjustments because every picture is different.
One useful technique when making adjustments by eye is to temporarily set the "Amount" slider up well above 150%. You want something way more extreme than you will actually use in your final edit.
Now when you adjust the "Radius" slider, you can more easily see the differences in the preview window. In general, I like to keep the pixel radius small. Rarely will you ever want to go above 2 pixels and most often it will be less than 1 pixel.
Here, I settled on 0.4 pixels. This decision was based on just looking at the preview.
One quick note about the "Remove" drop-down. It has only three options, each covering a different type of blur. Go ahead and try out each of the settings and look at the effect in the preview pane.
Gaussian blur generally refers to focus problems or an all-over fuzziness.
Lens blur is mainly for diffraction or softness caused by low quality lenses or filters.
Motion blur is for camera or subject movement and also activates the "Angle" control so you can tell Photoshop the direction of the blur.
Also note that the affect is applied only within the bounds of your selection area. That's the whole purpose of defining a selection area!
Adjusting the radius
A neat trick for previewing the radius setting
12. Finalize the Amount of Sharpening
Now with your radius selected, you can back off on the "Amount" slider until you get a more realistic effect.
It can be useful here to zoom in on your preview picture. Even if you can't see the entire selection area, you can "grab" the picture and move it around by clicking and dragging. Look at important details like eyes to get a very close up view of the effect of your edits.
You generally don't want to zoom in to more than 300%-400%. Even at this level, the image may show obvious pixelation.
Zooming in on the preview
Pixellation at extreme zoom
13. Double-Check the Result
As you back off the slider, you should see the results in the preview pane. You'll also be able to see the transition area where you feathered the selection.
If the transition does not look smooth enough, cancel the operation and go back to step 7.
If the pixelation is extreme in your preview, back off the zoom to get a better sense of the effect. When you're happy with it, click OK to apply your changes.
Now to compare the before and after!
By repeatedly clicking the eyeball icon next to your working layer, you can switch that layer off and on. This will let you see the results before and after your edits.
In this example, the swimmer was only slightly soft. More extreme examples or more extreme edits may yield more obvious results, but they will also be correspondingly hard to make appear natural.
Before and After
Compare the before and after
14. Flatten the Image
You can save your edited photo at any step along the way, but to actually use it for most purposes, you'll probably have to put it into a universal format. JPG and PNG are two very common universal formats. The thing with both of them is they do not support images with multiple layers.
So before you can save, you'll have to combine the layers into one. This is called "Flattening" the image.
To flatten your image, right-click (or Cmd-click) on one of the layers. Be warned that certain types of layers (there are many types of layers not covered in this tutorial) will not present you with a flatten option. Right-clicking on the Background layer is always a safe bet.
From the menu that pops up, select "Flatten Image". It's always the very last option.
Flatten Image
Flatten image
15. Save the Final File
You'll notice as soon as you flatten the image that all your layers instantly disappear, but all your edits are still intact. They are now part of the base image.
Now you can click File > Save (or File > Save As...) and then close your newly-sharpened image.
Hope its helpful for everyone over here if you couldn't get some part tag me will tell you how to do it
Original Source :
Spoiler: show
Code:
http://photography.tutsplus.com/tutorials/can-you-fix-a-blurry-picture--photo-12913
Last edited:


") can anyone provide complete Photoshop guide or tutorials???
can anyone provide complete Photoshop guide or tutorials???