Updates:
Alright guys here’s my guide of encoding of movies and anime. There are probably others out there too but here is my version.
This is my first time writing a guide on a forum I hope I get a positive feedback")
First of all I am not a professional in this field still in learning stage so if anyone finds something wrong /want to suggest something in this guide him/her can write below so that we can further discuss to improve this guide + output.
Second normally I encode anime but for encoding movies the procedure is same with some perimeters changed. I will be explaining for both.
Encoding or converting is same though encoding is more technical word and I like it so below only it will be mentioned. It is a process to change one form of data to another as per specified by a codec. The data can be audio, video or both. Normally encoding is done to:.
Here I will be discussing the both of the above mentioned reasons.
300 MB movies or Mini-encodes:
Format:
Codec:
Source:
Software:
It is highly recommended that you read the guide all the way to bottom before starting the actual encoding.
Open Handbrake and the main interface of program will be displayed. Let it update if it asks.

Click ‘Tools’ --> ‘Options’ here make some changes. In ‘Output’ tab select default path to for output files (I have selected Desktop). In ‘System and Logging’ tab change priority level to ‘Above Normal’. Nothing more to change close the dialog box.
=========================================
Movie Re-encoding
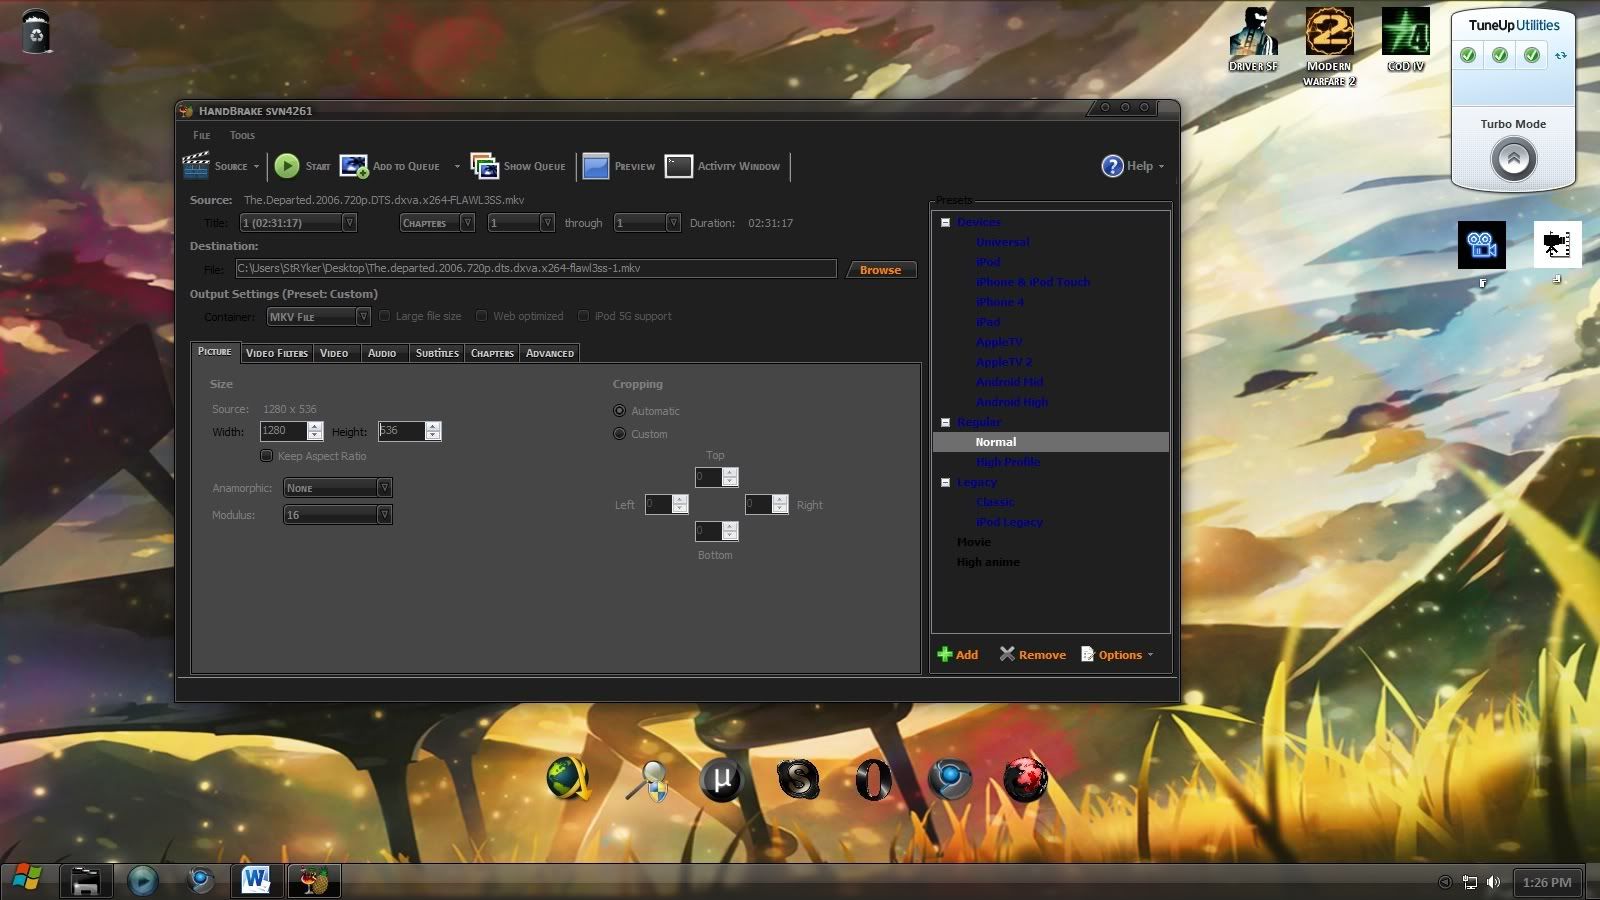
1. Click on ‘Source’ and select ‘Video File’ to open episode needed for re-encoding, to simplify you can also press ‘Ctrl + O’ .
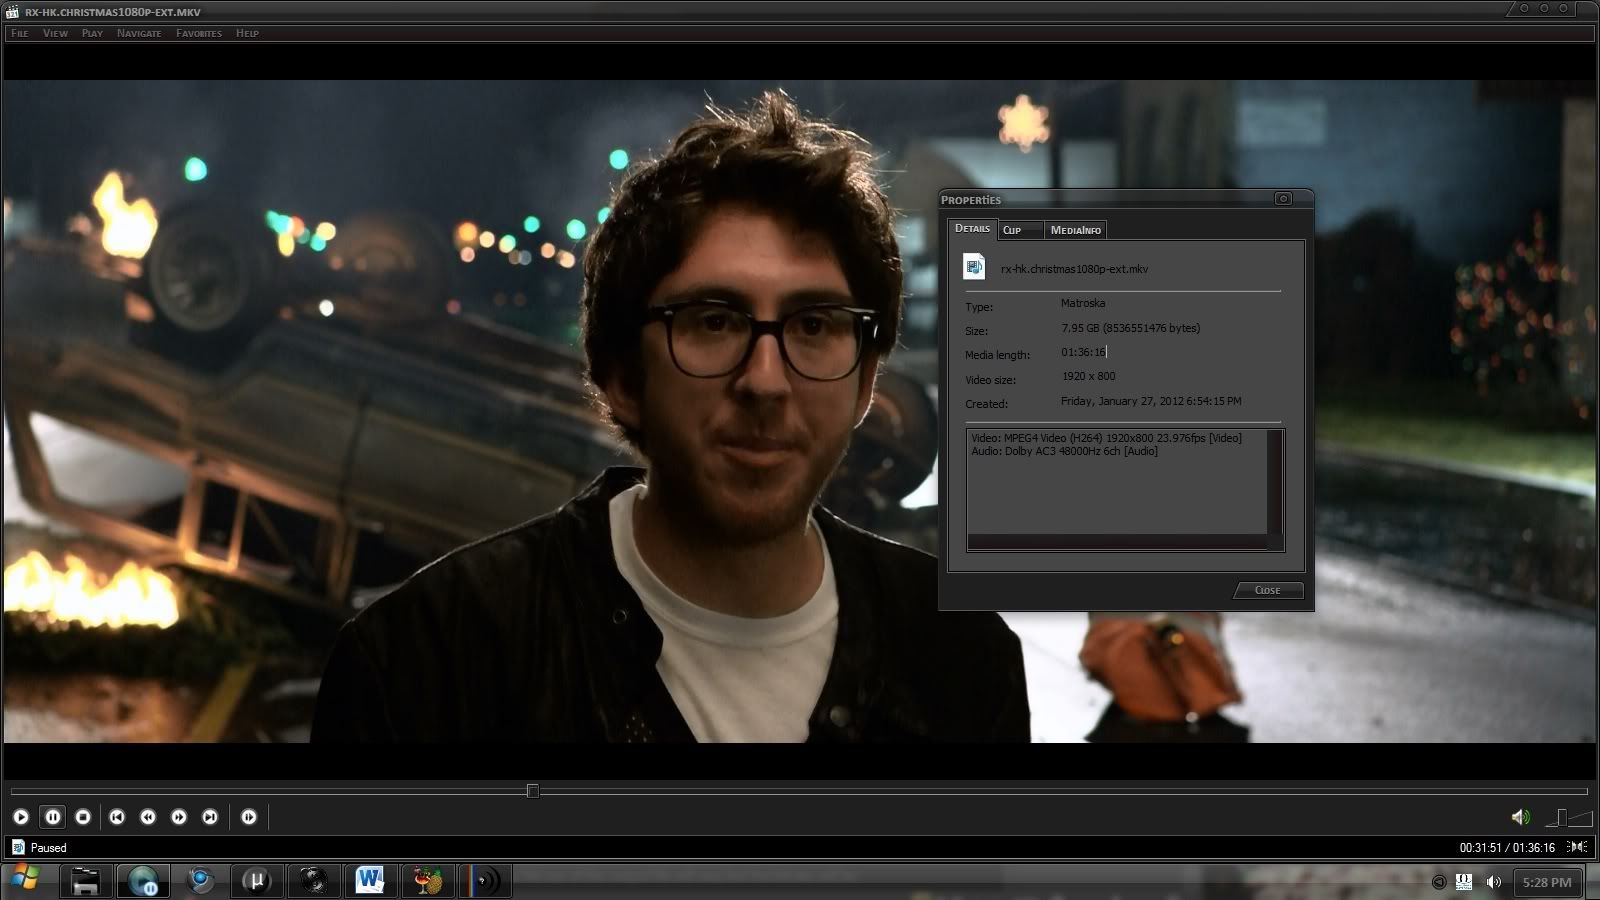
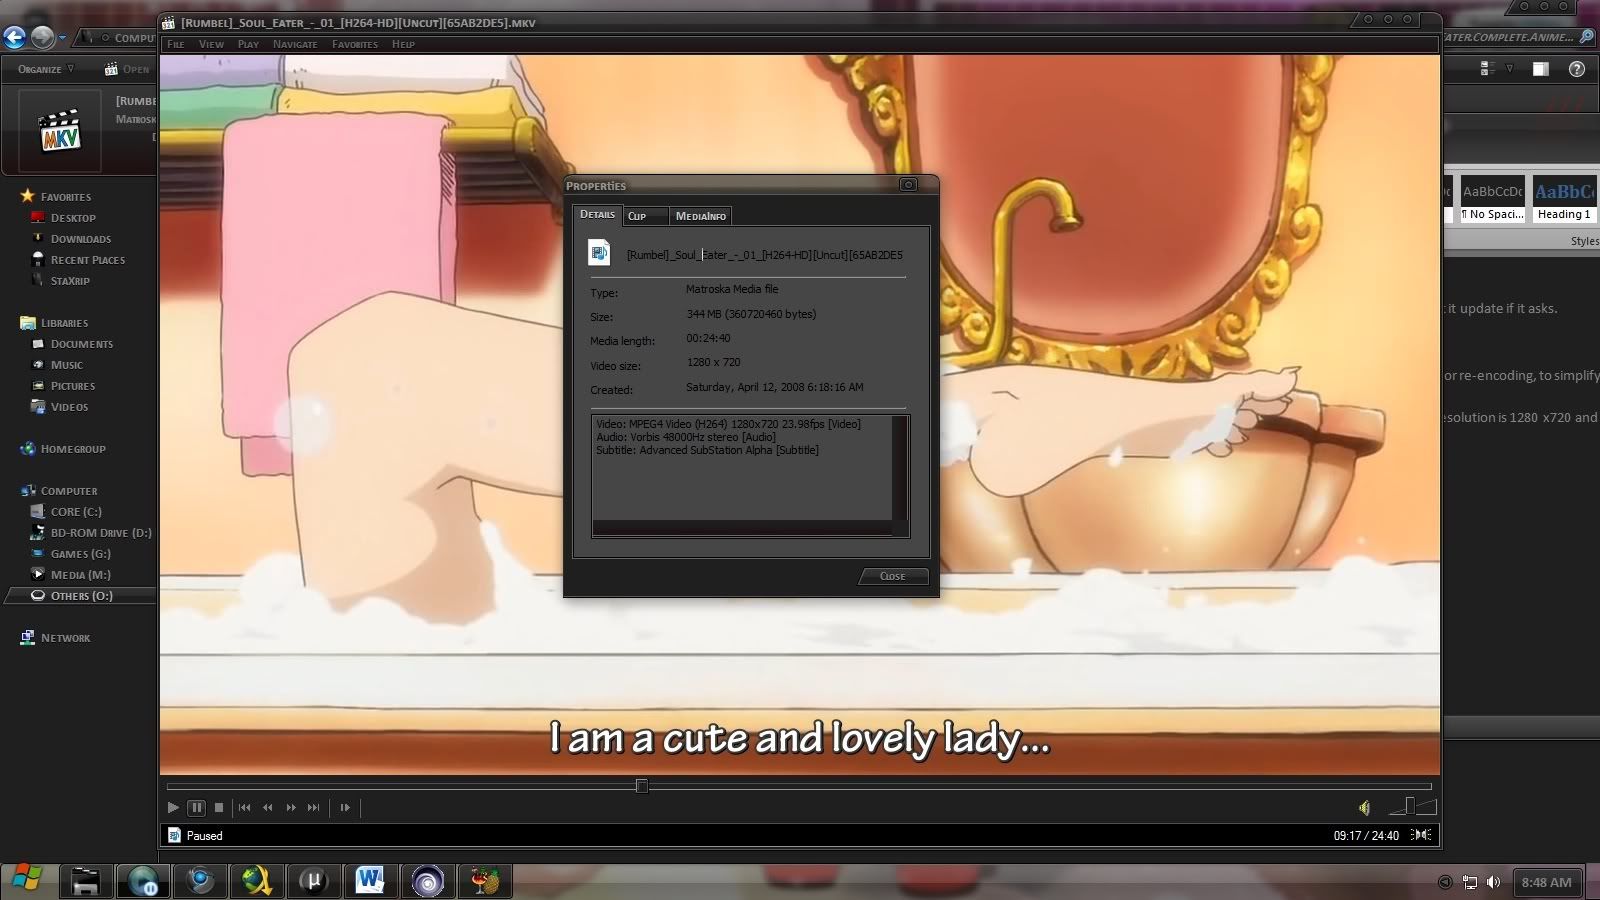
Here the source will be movie ‘A Very Harold and Kumar Christmas’. Format is MKV, resolution is 1920 x 800 (told you above the reason :/) and size is 7.95 GB as you can see below.
2. Select ‘High Profile’ from left column. In ‘Container’ select MKV file. In ‘Picture’ tab select ‘None’ in ‘Anamorphic’ drop down box. In ‘width’ place 1280 and for ‘height’ write 536 (We are doing the same as other encoders out there. Remember upscaling is no good it will only add extra size in output while the quality will remain unchange. Some people think that if they upscale a 800x480 DVD to 1280x720 their video will become HD lol ).
3. For time being set everything to OFF in video filters tab.
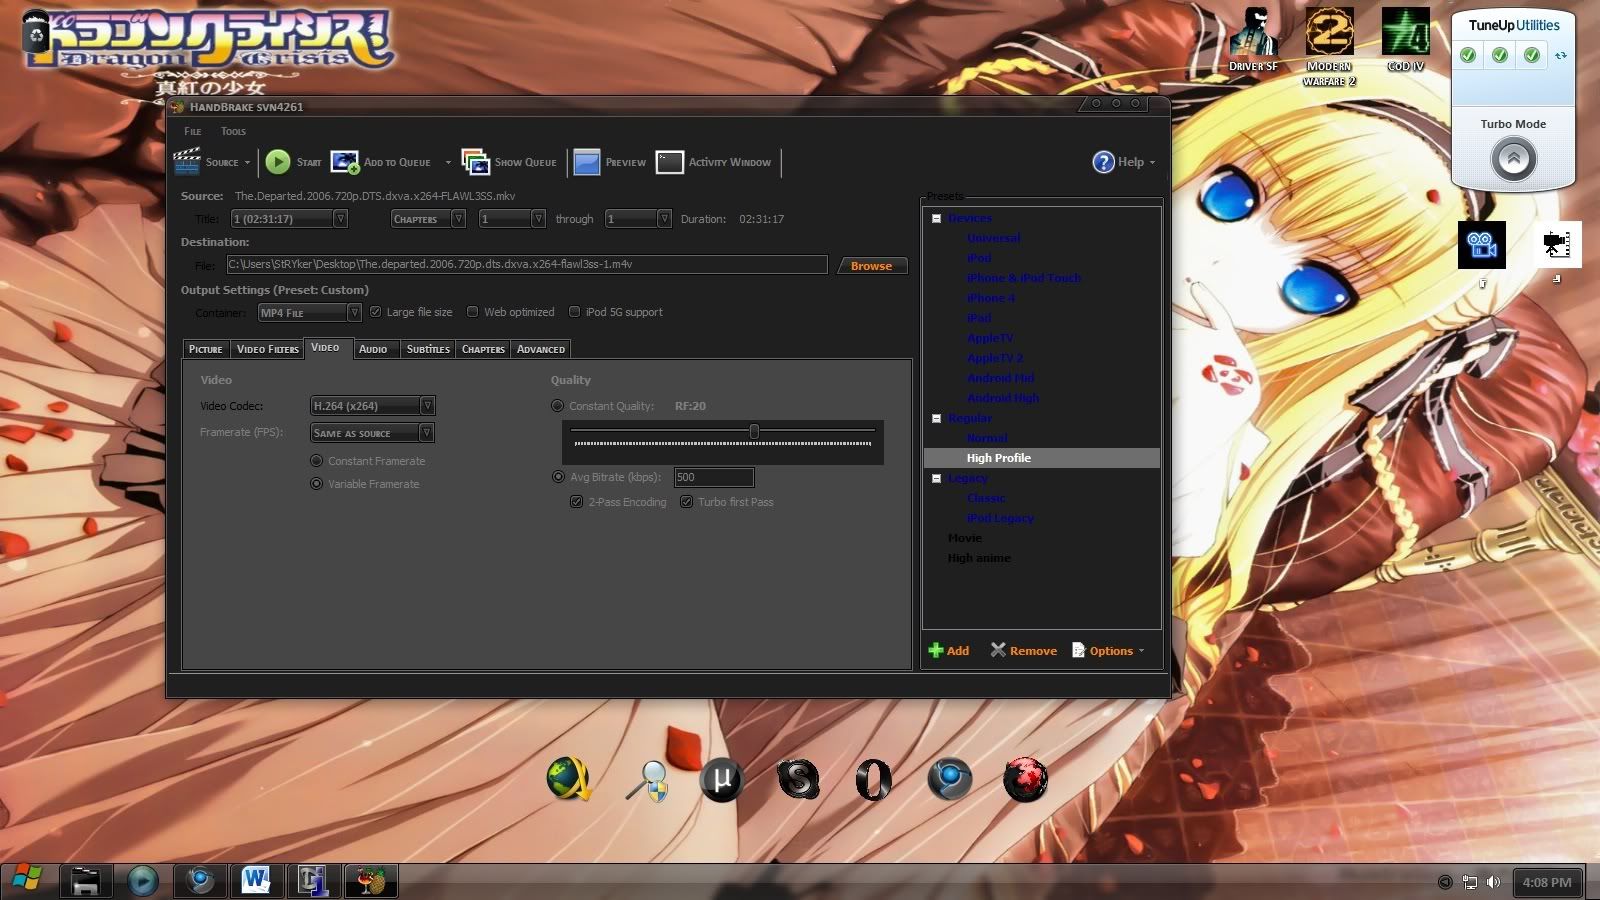
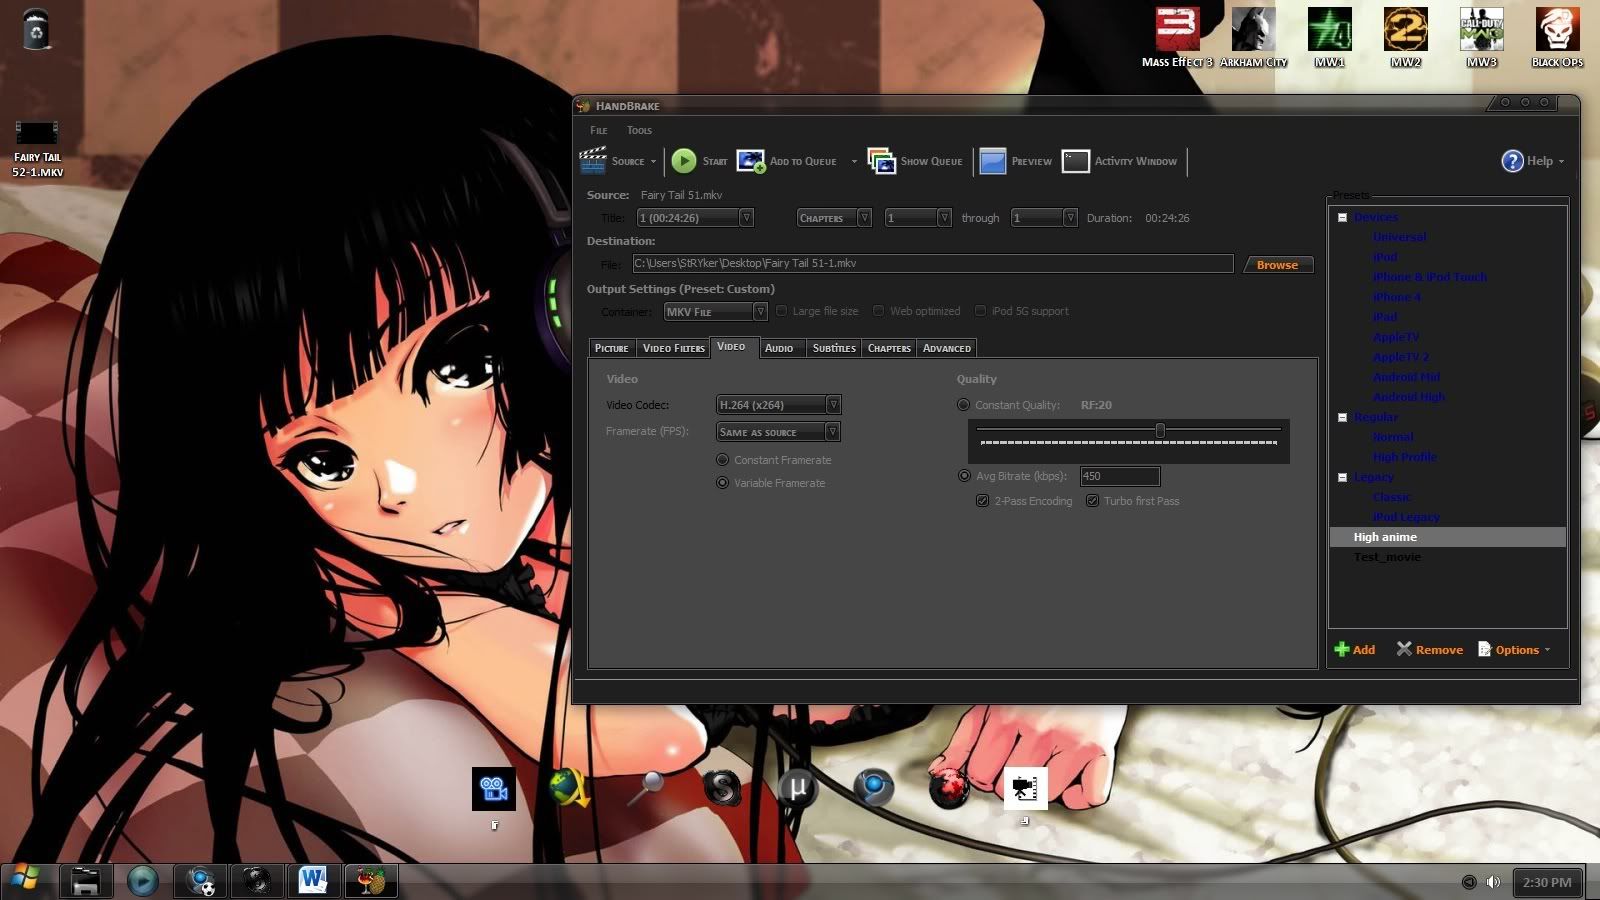
4. In ‘Video’ tab select ‘H.264(x264)’ as ‘Video Codec’. In ‘Framerate’ select ‘Same As Source’ and below it select ‘Varible Framerate’. OK in ‘Quality’ we got two things 1 ‘Constant Quality’ while the other is ‘Avg. Bitrate’.
I prefer 2-pass encoding over CRF because with it you can achieve better quality. So select ‘Avg. Bitrate’ and write ‘1000’ in text box. Select ‘2- pass Encoding’ with ‘Turbo first Pass’ selected.
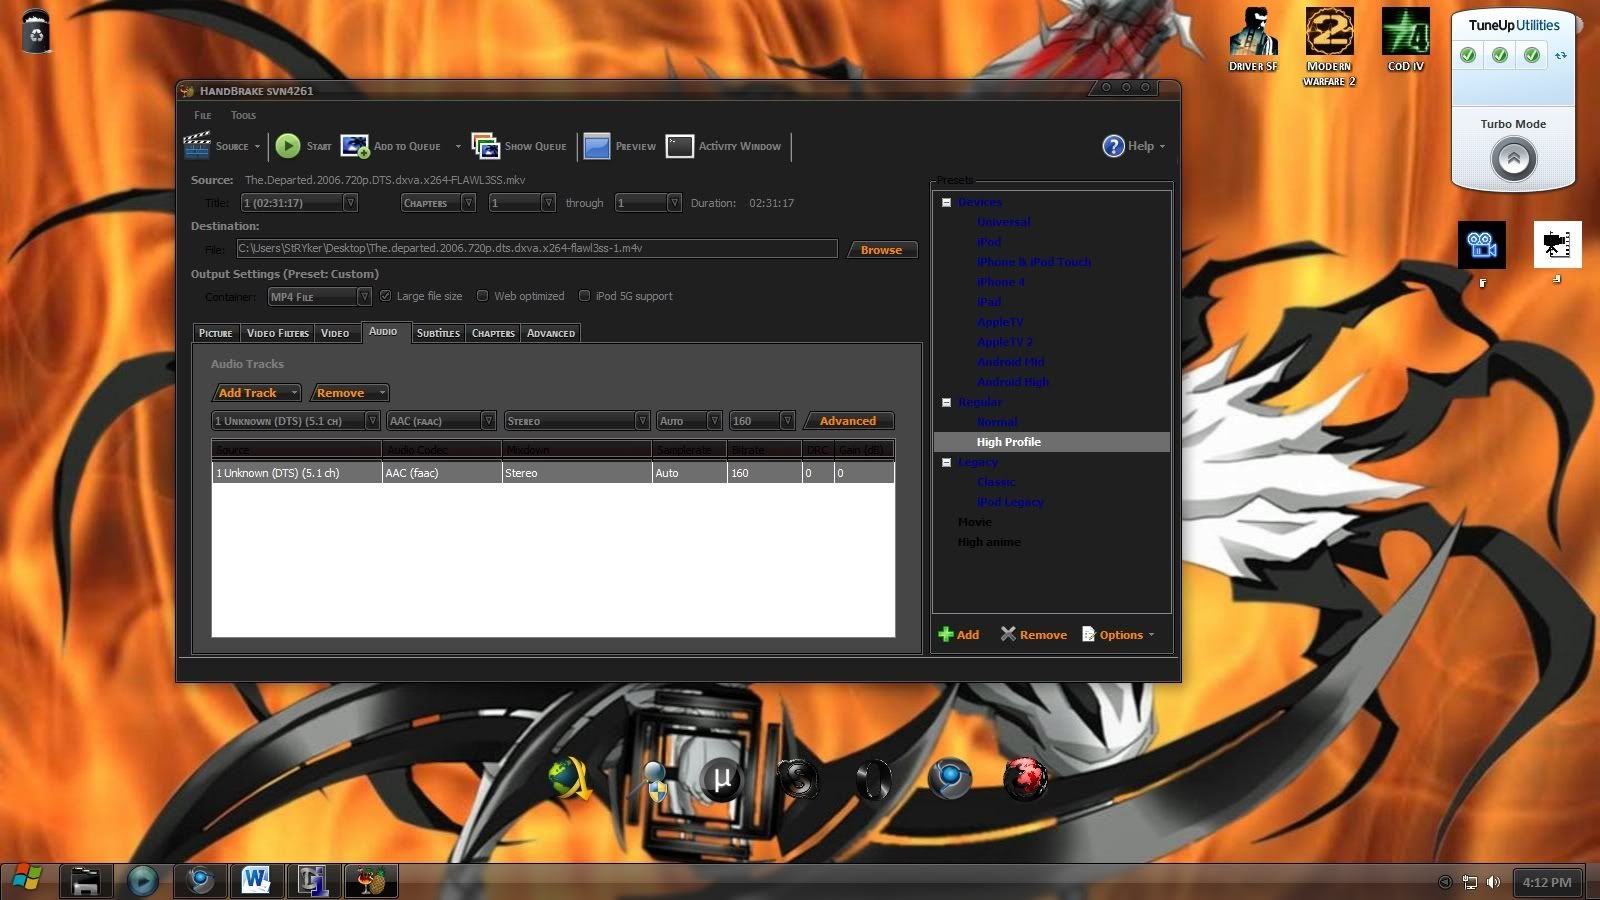
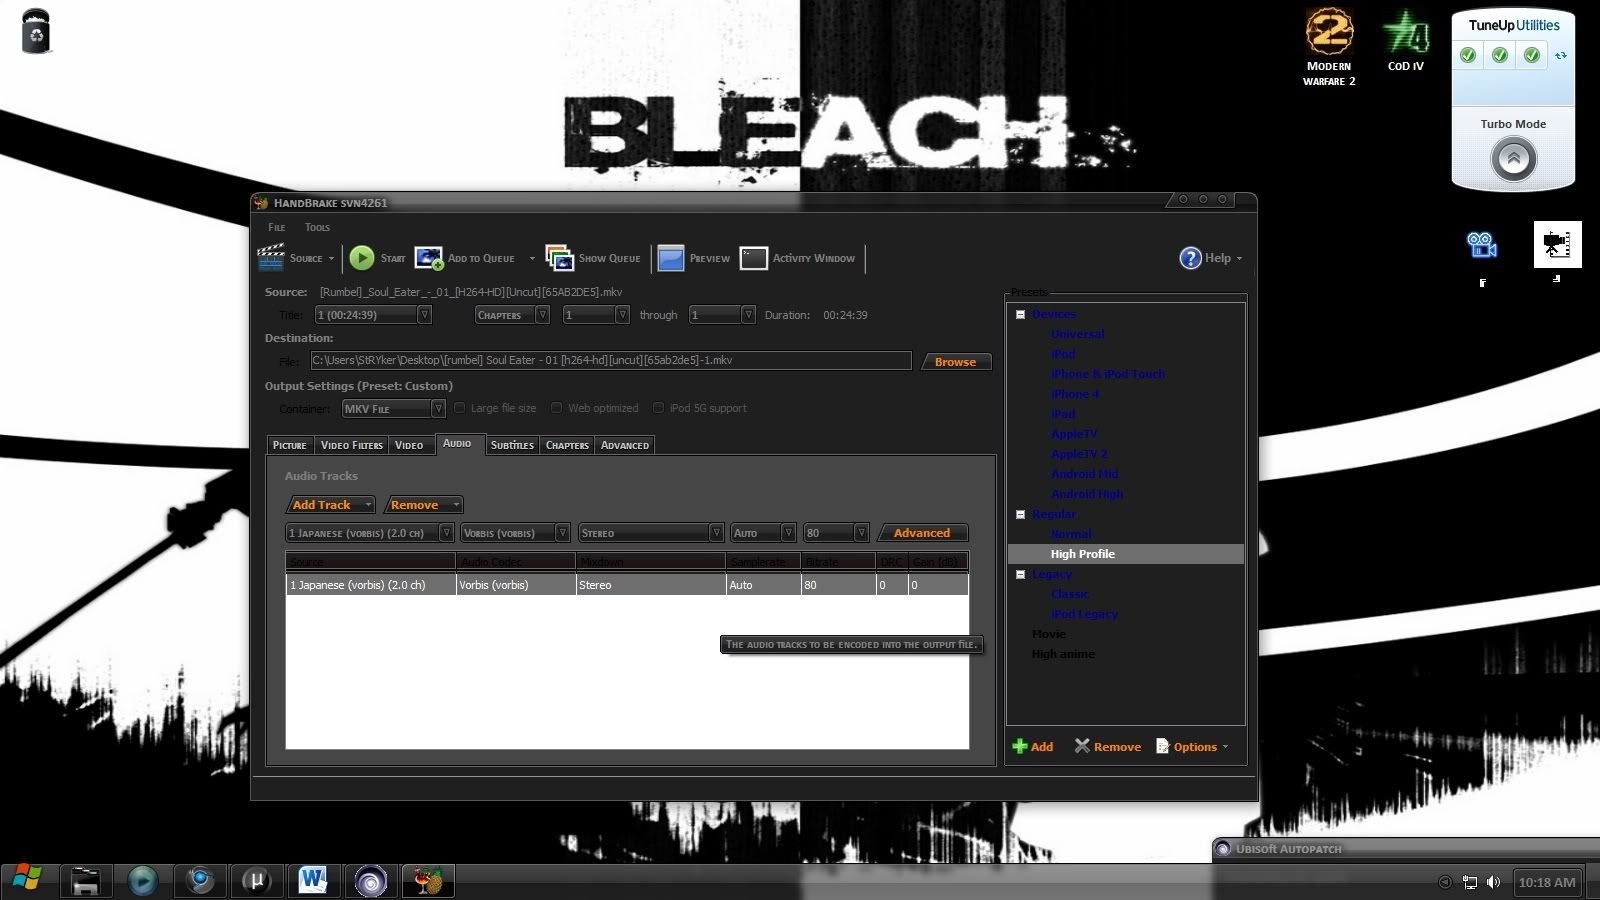
5. In ‘Audio’ tab click ‘Remove’ repeatedly to delete all audio queues. Below ‘Add Track’ button select desire track in drop box [here it is English (AC3) (5.1 Ch.)].
In ‘Audio Codec’ select ‘AAC (FAAC)’. ‘Mixdown’ to be ‘Stereo’ (As we are mini-encoding so forget about 6 CH, Stereo is also nice ).
In ‘Bitrate’ select ‘160’. Now click ‘Add Track’ the audio will now appear in queue list. If a movie contains multi audio then you will have to repeat the above mentioned steps for each audio (the first audio in queue will be default audio).
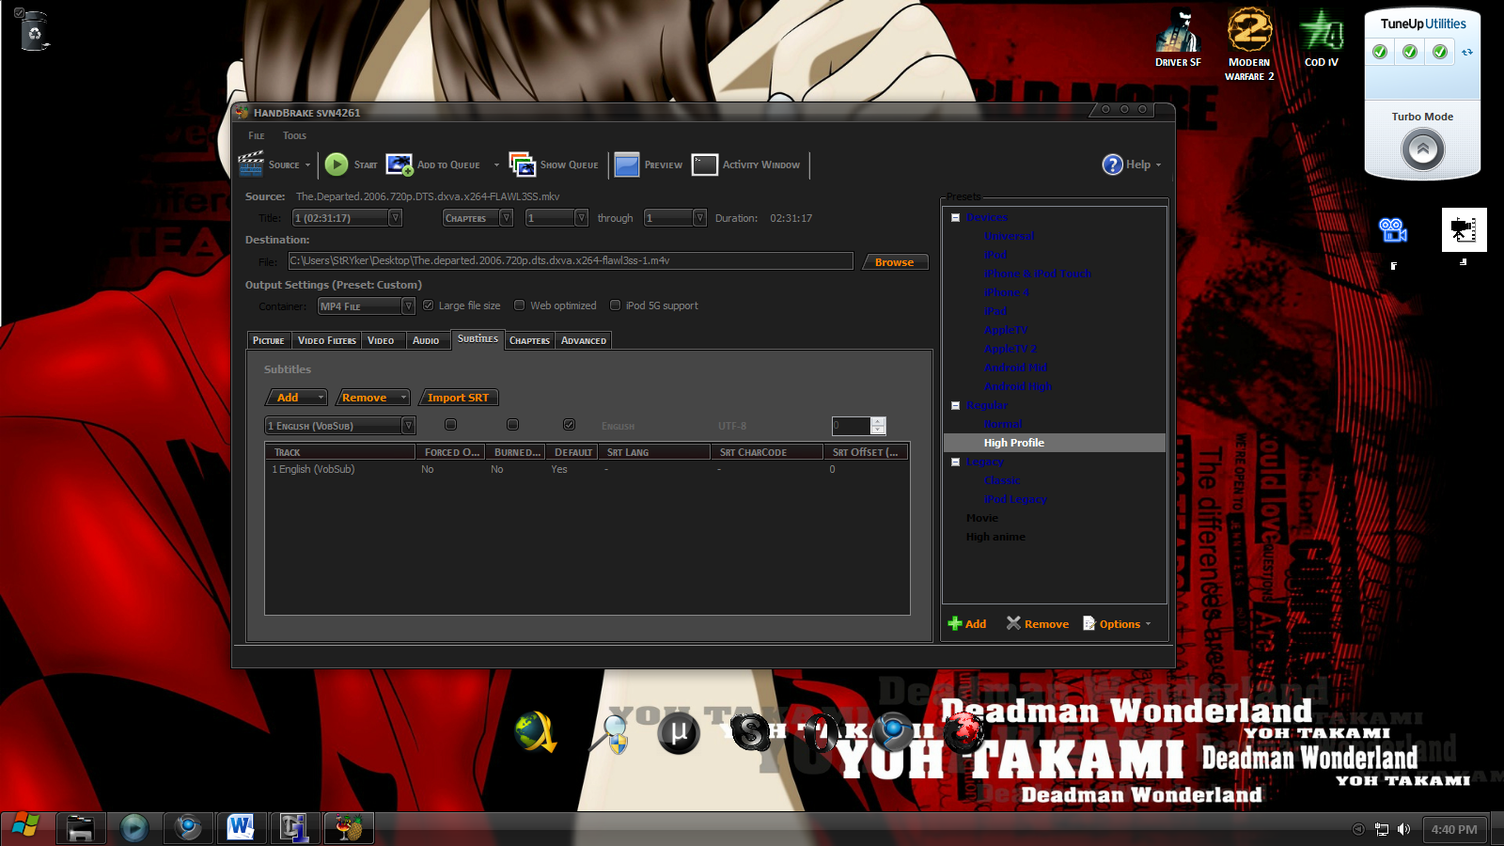
6. Go to ‘Subtitles’ tab, select the subtitle under ‘Add’, select ‘Burned In’ checkbox for hardsubbed or ‘Default’ for softsubbed.
If there are no subtitles attached in source video then ‘Foreign Audio Search’ will be displayed.
I use default i.e. soft subs.
7. Come straight to ‘Advanced’ tab, here we will set the perimeters that I talked above. Here change the value of following as stated below.
If you want some more info of the settings in the ‘Advanced’ tab just hover your mouse on each settings and wait for a tool tip to appear.
Click ‘Add’ in presets pane to save the settings. Name the preset according to your liking , select ‘None’ in picture size and check ‘Save Filter Settings’
Ok all done (at last :/) now before we click ‘Start’, press the ‘Preview’ button in duration select 120 secs make sure ‘Use system default’ is selected, click on ‘Play’. This will re-encode the first 120 secs of the movie to lets us check how our output will look like. After completing it will automatically play the encoded video, see if it comes to your expectations, remember it will never be alike that 6-7 GB source. If yes then HIT ‘Start’ on top to begin encoding or press ‘Add to Queue’ if you want to process multiple encodes. After starting you will get status in bottom, for advanced encode log press ‘Activity Window’ on top.
It is recommended to have a CPU cooler before starting encoding as your processor can get really hot during the 2[SUP]nd[/SUP] pass.
As the 120 sec is mostly intro of movie so is better to check your settings with a sample provided with the movie. (If no sample then you have go with 120 sec method)
Anime Re-encoding
Anime is encoding is same as the movie encoding with perimeters tweaked to optimize with ‘Animation’ source.
1. Click on ‘Source’ and select ‘Video File’ to open episode needed for re-encoding, to simplify you can also press ‘Ctrl + O’ .
2. Select ‘High Profile’ from left column. In ‘Container’ select MKV file. In ‘Picture’ tab select ‘None’ in ‘Anamorphic’ drop down box. In ‘width’ place 1280 and for ‘height’ write 600 (for reason read above) . Ok so I have changed my settings why? cause as the source is already in true 720p, so you don't need to change it. So keep it 1280 as width and 720 as height .
3. Turn every thing to OFF here too .
4. In ‘Video’ tab select ‘H.264(x264)’ as ‘Video Codec’. In ‘Framerate’ select ‘Same As Source’ and below it select ‘Varible Framerate’. OK in ‘Quality’ we got two things 1 ‘Constant Quality’ while the other is ‘Avg. Bitrate’, I will explain both.
I prefer 2-pass encoding over CRF because with it you can achieve better quality. So select ‘Avg. Bitrate’ and write ‘450’ in text box. Select ‘2- pass Encoding’ with ‘Turbo first Pass’ selected.
5. In ‘Audio’ tab click ‘Remove’ repeatedly to delete all audio queues. Below ‘Add Track’ button select desire track in drop down menu.
In ‘Audio Codec’ select ‘Vorbis’ OR ‘AAC (FAAC)’.If you plan to watch anime on your PC only then choose Vorbis otherwise . ‘Mixdown’ can be ‘Mono’ or’ Stereo’ ( If source has 6 CH. FLAC source you need to select mono as Mixdown and bitrate should be 48 Kbps).
In ‘Bitrate’ select ‘160’. Now click ‘Add Track’ the audio will now appear in queue list. If anime contains multi audio (like both Japanese + English) then you will have to repeat the above mentioned steps for each audio (the first audio in queue will be default audio).
6. Go to ‘Subtitles’ tab, select the subtitle under ‘Add’ (here it is English SSA), select ‘Burned In’ checkbox for hardsubbed or’ Default’ for softsubbed.
I use default i.e. soft subs.

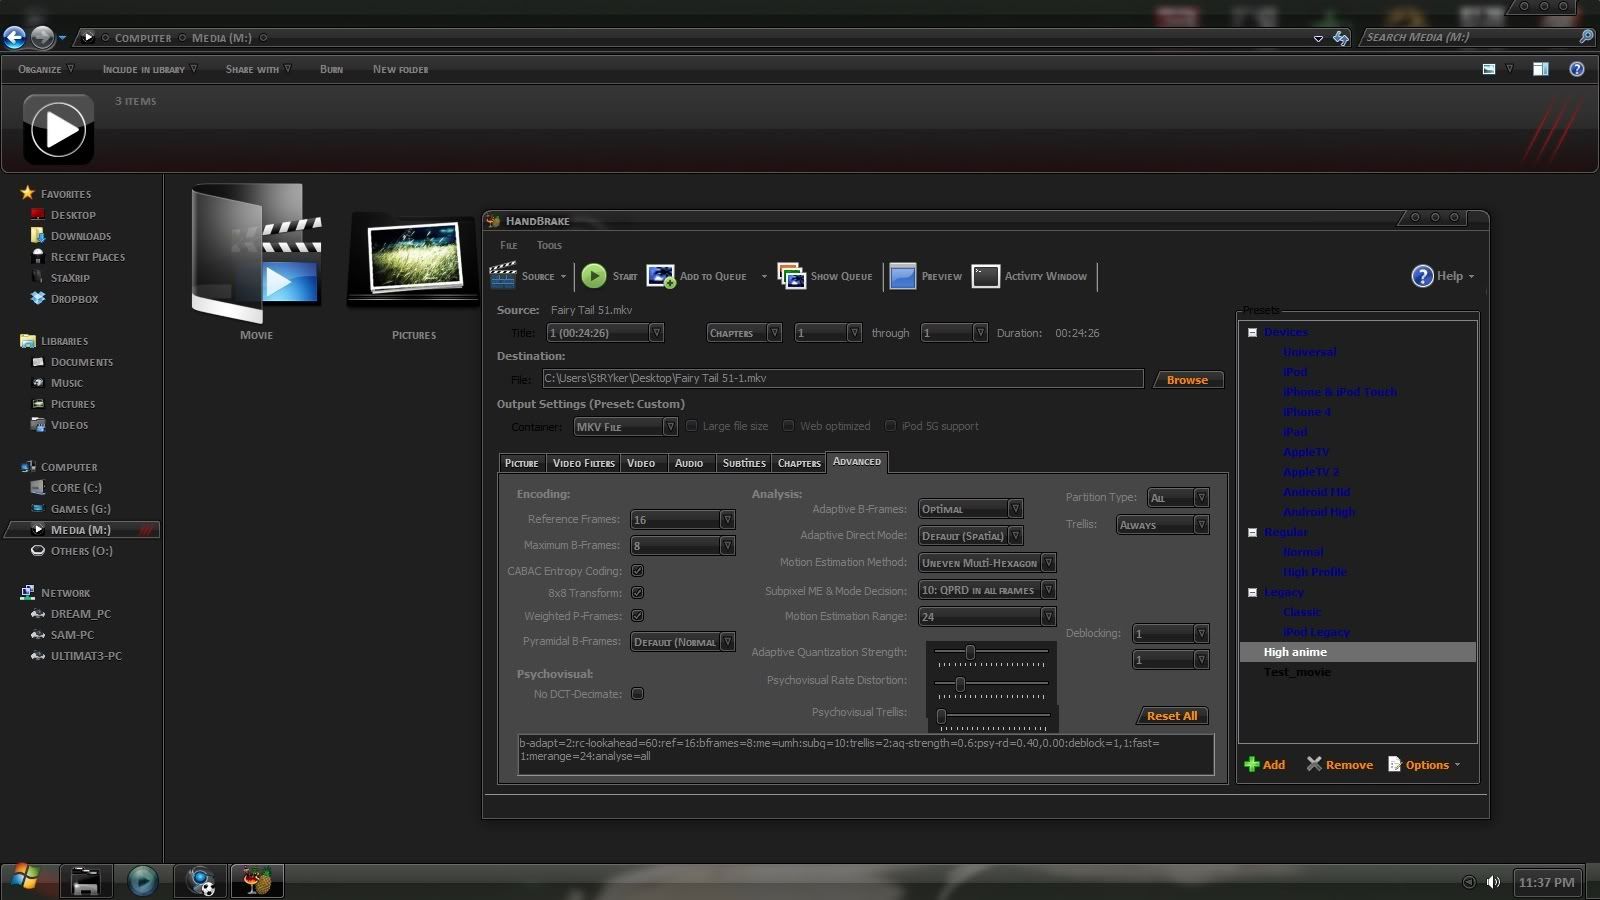
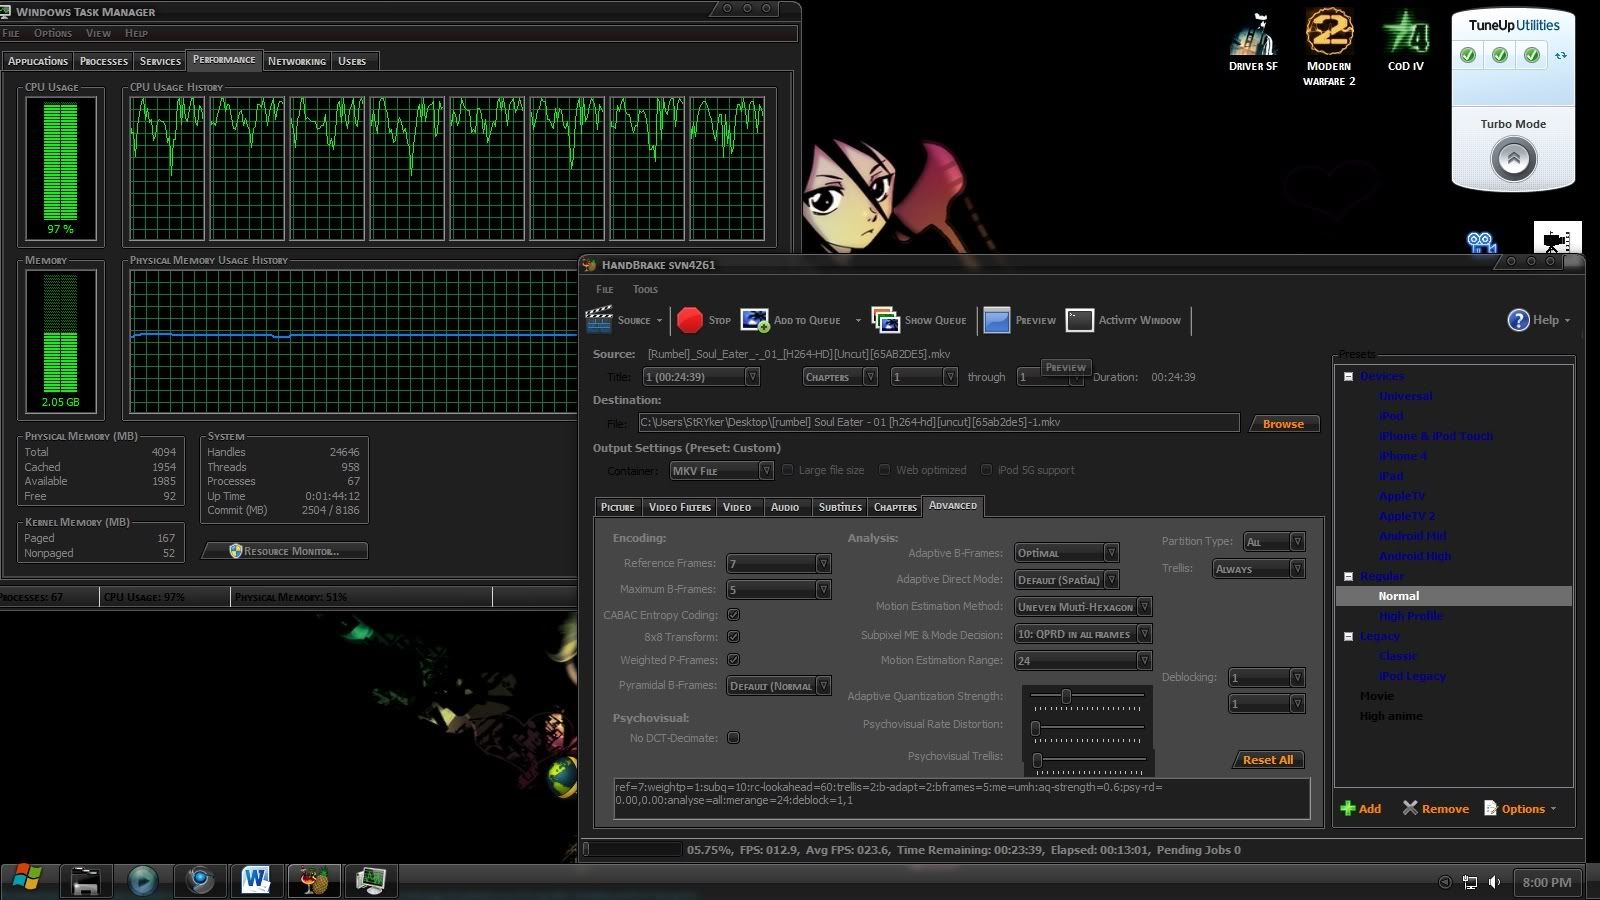
7. Come straight to ‘Advanced’ tab, here we will set the perimeters that I talked above. Here change the value of following as stated below.
If you want some more info of the settings in the ‘Advanced’ tab just hover your mouse on each settings and wait for a tool tip to appear.
Click ‘Add’ in presets pane to save the settings. Name the preset according to your liking, select ‘None’ in picture size and check ‘Save Filter Settings’
All right we are all set, now click ‘Start’ to start the encoding or press ‘Add to Queue’ if you want to process multiple encodes. After starting you will get status in bottom, for advanced encode log press ‘Activity Window’ on top.
It is recommended to have a CPU cooler before starting encoding as your processor can get really hot during the 2[SUP]nd[/SUP] pass.
Not much load of processor during 1[SUP]st[/SUP] pass.
Now for real encoding, Le 2[SUP]nd[/SUP] PASS
After 25 minutes the video is encoded and here are the output properties.
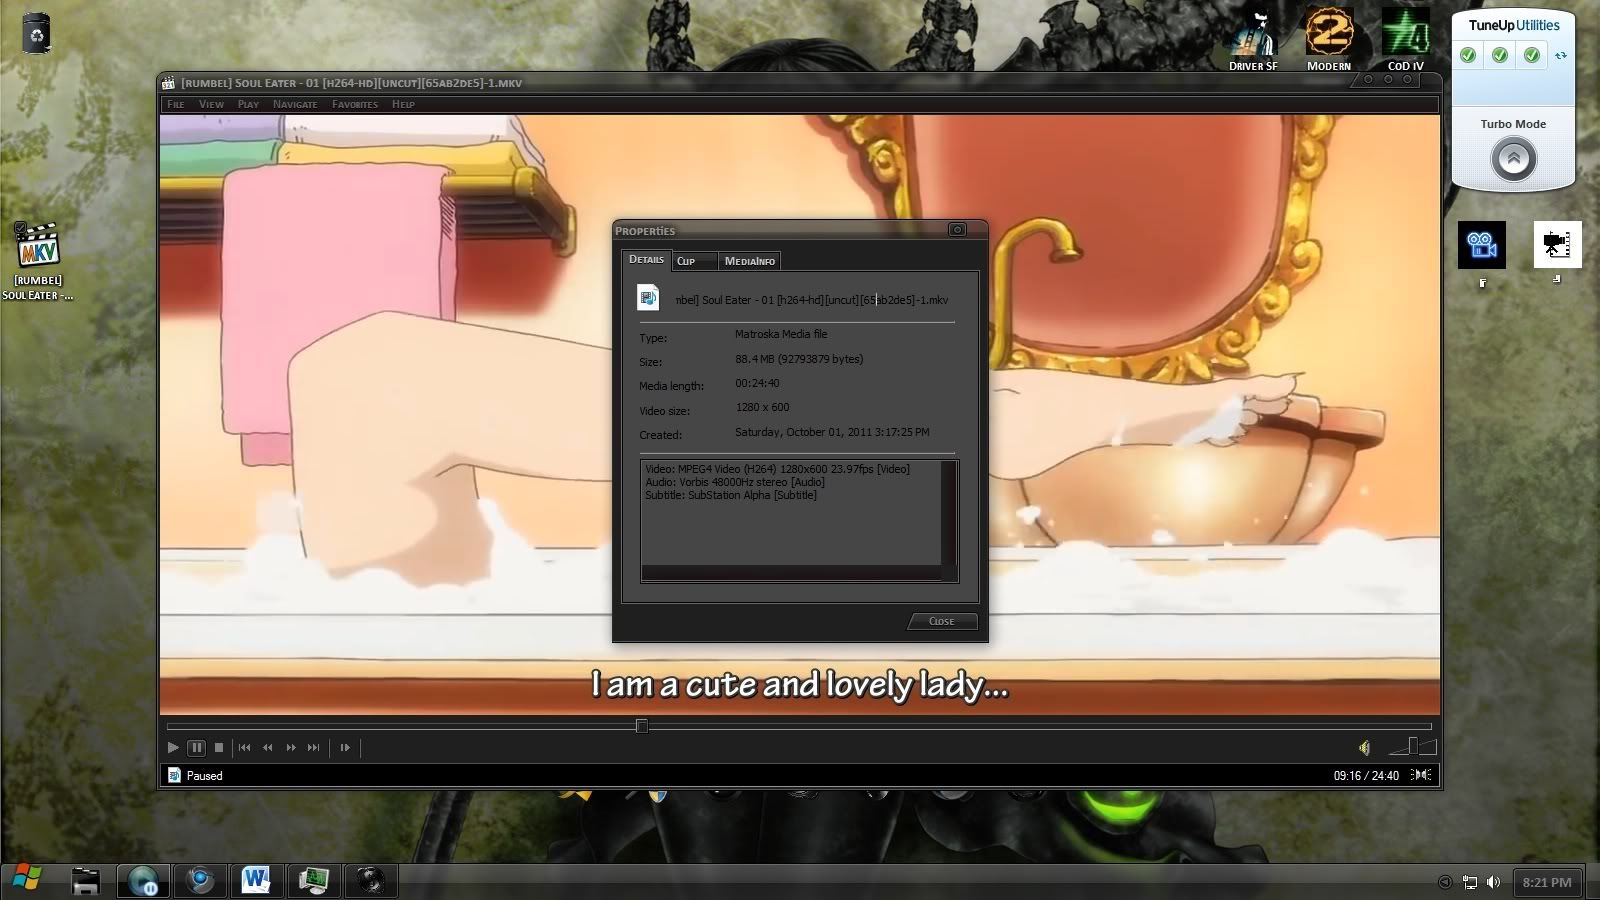
The source was 344 MB (added below) while the output is 88 MB.
Ok this ends the first part of guide i.e
Stay Tuned for the other part . will be delayed due to extreme load shedding :/ .
Spoiler: show
Added original source for Anime.
Alright guys here’s my guide of encoding of movies and anime. There are probably others out there too but here is my version.
This is my first time writing a guide on a forum I hope I get a positive feedback
First of all I am not a professional in this field still in learning stage so if anyone finds something wrong /want to suggest something in this guide him/her can write below so that we can further discuss to improve this guide + output.
Second normally I encode anime but for encoding movies the procedure is same with some perimeters changed. I will be explaining for both.
BASICS
So what is encoding? Spoiler: show
Encoding or converting is same though encoding is more technical word and I like it so below only it will be mentioned. It is a process to change one form of data to another as per specified by a codec. The data can be audio, video or both. Normally encoding is done to:.
- Compress the data to reduce space. (300MB movies or Mini-Encodes)
- Make a file compatible with certain hardware (Blu-ray player, VCD player, DVD player etc.
Here I will be discussing the both of the above mentioned reasons.
300 MB movies or Mini-encodes:
Spoiler: show
I don’t know why they are popular with 300MB name as the end result can even cross 500 MB lol. I will be encoding 4 – 6 GB 720p movie to near NOT exactly 300MB 720p Movie.
So how do they achieve this? Well first most of these re-encoded movies are not truly 720p or 1080p, they are either 1280 x 566 (for 720p) OR 1920 x 800 or 900 (for 1080p) surprised? Ya this decreases the size very much but also some loss of quality but this quality loss is not noticeable to our eye unless we play the 720p version on 1080p display AND secondly these professional encoders like Scorp, aXXo, flawless etc. use a lot of perimeters /settings in the encoding software’s which helps in decreasing the loss of quality. Remember encoding requires a high end system (I recommend an i7/5 along with 6/4GB RAM) also the higher you set the codec perimeters the more time it will take to encode a full movie.
Mini-Encodes is usually used for anime. These encoded from 250 - 350 MB per episode to 90 -110 MB per episode. Same case is applied here no full 720p, time taken is less cause one anime episode is 24 min.
Format:
Spoiler: show
My favorite is Matroska, first was AVI btw both are similar but several new features like OGG audio support and Variable Framerate for Video has been added to Matroska but best thing is that it is an open source container. Its file formats are:
- MKV: Container for audio + video or video alone.
- MKA: Audio only
- MKS: Don't know much about it :/ related to subtitles I think.
Codec:
Spoiler: show
As Matroska is an open source container - not limited to any codec or system-, so it can hold virtually anything. I personally use h264 which is encoded through X264.
Source:
Spoiler: show
Source should be good at least a 720p Blu-ray movie and for anime 250 – 350 MB 720p is great. MKV as source formats are recommended. Remember you will gain nothing from an already compressed video like YouTube vids, BRrip, DVDrip encoding them will only result in more loss of quality while the end size will be near to the source.
Software:
Spoiler: show
I personally use free programs for encoding like Handbrake and Staxrip there are others too like mini-coder, megui, avdmux but I prefer these two only.
You can try ‘Mainconcept’ if you have ‘faaltu paisa’ to spend.
All these software’s are GUI front ends for the single encoder which is X264.
Handbrake:
It’s my favorite encoder, easy to use as compared to other encoders out there. Download it from http://build.handbrake.fr/ . Click "Windows" under the “Nightlies” tab. Then download file which says "WindowsGUI" or "Win GUI”. Download the one which matches your OS ‘bit’ (for 32bit -i686 and for 64bit -x86_64- build. Make sure you have .Net 3.5 sp1 installed, without it the program will not work. For download link Google is your friend.
Staxrip:
Use this encoder only if you want to add watermark text on your encoded videos, I use it for same purpose with my anime encodes during my uploading days otherwise Handbrake is best .
For this guide I will be only writing about Handbrake, if you need guide for Staxrip you can request in comments below.
You can try ‘Mainconcept’ if you have ‘faaltu paisa’ to spend.
All these software’s are GUI front ends for the single encoder which is X264.
Handbrake:
It’s my favorite encoder, easy to use as compared to other encoders out there. Download it from http://build.handbrake.fr/ . Click "Windows" under the “Nightlies” tab. Then download file which says "WindowsGUI" or "Win GUI”. Download the one which matches your OS ‘bit’ (for 32bit -i686 and for 64bit -x86_64- build. Make sure you have .Net 3.5 sp1 installed, without it the program will not work. For download link Google is your friend
.Staxrip:
Use this encoder only if you want to add watermark text on your encoded videos, I use it for same purpose with my anime encodes during my uploading days
otherwise Handbrake is best .For this guide I will be only writing about Handbrake, if you need guide for Staxrip you can request in comments below.
It is highly recommended that you read the guide all the way to bottom before starting the actual encoding.
Open Handbrake and the main interface of program will be displayed. Let it update if it asks.
Click ‘Tools’ --> ‘Options’ here make some changes. In ‘Output’ tab select default path to for output files (I have selected Desktop). In ‘System and Logging’ tab change priority level to ‘Above Normal’. Nothing more to change close the dialog box.
=========================================
Movie Re-encoding
1. Click on ‘Source’ and select ‘Video File’ to open episode needed for re-encoding, to simplify you can also press ‘Ctrl + O’ .
Here the source will be movie ‘A Very Harold and Kumar Christmas’. Format is MKV, resolution is 1920 x 800 (told you above the reason :/) and size is 7.95 GB as you can see below.
2. Select ‘High Profile’ from left column. In ‘Container’ select MKV file. In ‘Picture’ tab select ‘None’ in ‘Anamorphic’ drop down box. In ‘width’ place 1280 and for ‘height’ write 536 (We are doing the same as other encoders out there
. Remember upscaling is no good it will only add extra size in output while the quality will remain unchange. Some people think that if they upscale a 800x480 DVD to 1280x720 their video will become HD lol ).Spoiler: show
3. For time being set everything to OFF in video filters tab.
4. In ‘Video’ tab select ‘H.264(x264)’ as ‘Video Codec’. In ‘Framerate’ select ‘Same As Source’ and below it select ‘Varible Framerate’. OK in ‘Quality’ we got two things 1 ‘Constant Quality’ while the other is ‘Avg. Bitrate’.
Spoiler: show
“In ‘Constant Quality’ the file size of the output file will vary but the bitrate will be constant through out the video playback. The higher the value in CRF the lesser the filesize and lesser quality and vice versa. Preferred CRF value is 24 – 28 for anime and 22 – 26 for movies. CRF is faster way of encoding as it is only 1- pass.”
“In ‘Avg. Bitrate’ the bitrate varies depending on the video current scene e.g If a video has a lot of static scenes (less movements) then there the bitrate will be high and in action scenes (like running, gun fighting) here the bitrate is decreased to favor the size".
You might be thinking that if high motion scenes have low bitrate then the video will become blurry well here the ‘Variable Framerate’ comes into play. High motions get more FPS while static scenes get low fps. ‘Avg. Bitrate’ or 2- pass encoding is slow as in 1st pass the video is analyzed (to calculate where it needs more bitrate and vice versa) and in 2[SUP]nd[/SUP] pass the video is re-encoded.
“In ‘Avg. Bitrate’ the bitrate varies depending on the video current scene e.g If a video has a lot of static scenes (less movements) then there the bitrate will be high and in action scenes (like running, gun fighting) here the bitrate is decreased to favor the size".
You might be thinking that if high motion scenes have low bitrate then the video will become blurry well here the ‘Variable Framerate’ comes into play. High motions get more FPS while static scenes get low fps
. ‘Avg. Bitrate’ or 2- pass encoding is slow as in 1st pass the video is analyzed (to calculate where it needs more bitrate and vice versa) and in 2[SUP]nd[/SUP] pass the video is re-encoded.I prefer 2-pass encoding over CRF because with it you can achieve better quality
. So select ‘Avg. Bitrate’ and write ‘1000’ in text box. Select ‘2- pass Encoding’ with ‘Turbo first Pass’ selected.Spoiler: show
5. In ‘Audio’ tab click ‘Remove’ repeatedly to delete all audio queues. Below ‘Add Track’ button select desire track in drop box [here it is English (AC3) (5.1 Ch.)].
In ‘Audio Codec’ select ‘AAC (FAAC)’. ‘Mixdown’ to be ‘Stereo’ (As we are mini-encoding so forget about 6 CH, Stereo is also nice
). In ‘Bitrate’ select ‘160’. Now click ‘Add Track’ the audio will now appear in queue list. If a movie contains multi audio then you will have to repeat the above mentioned steps for each audio (the first audio in queue will be default audio).
Spoiler: show
6. Go to ‘Subtitles’ tab, select the subtitle under ‘Add’, select ‘Burned In’ checkbox for hardsubbed or ‘Default’ for softsubbed.
If there are no subtitles attached in source video then ‘Foreign Audio Search’ will be displayed.
Spoiler: show
Hardsubbed: The subtitles are permanent part of the video so you cannot turn then off or remove them.
Softsubbed: The subtitles are just part of the video like a text display that can easily be turned off or ON and these kinds of subtitles can also be extracted.
Softsubbed: The subtitles are just part of the video like a text display that can easily be turned off or ON and these kinds of subtitles can also be extracted.
I use default i.e. soft subs.
Spoiler: show
7. Come straight to ‘Advanced’ tab, here we will set the perimeters that I talked above. Here change the value of following as stated below.
Spoiler: show
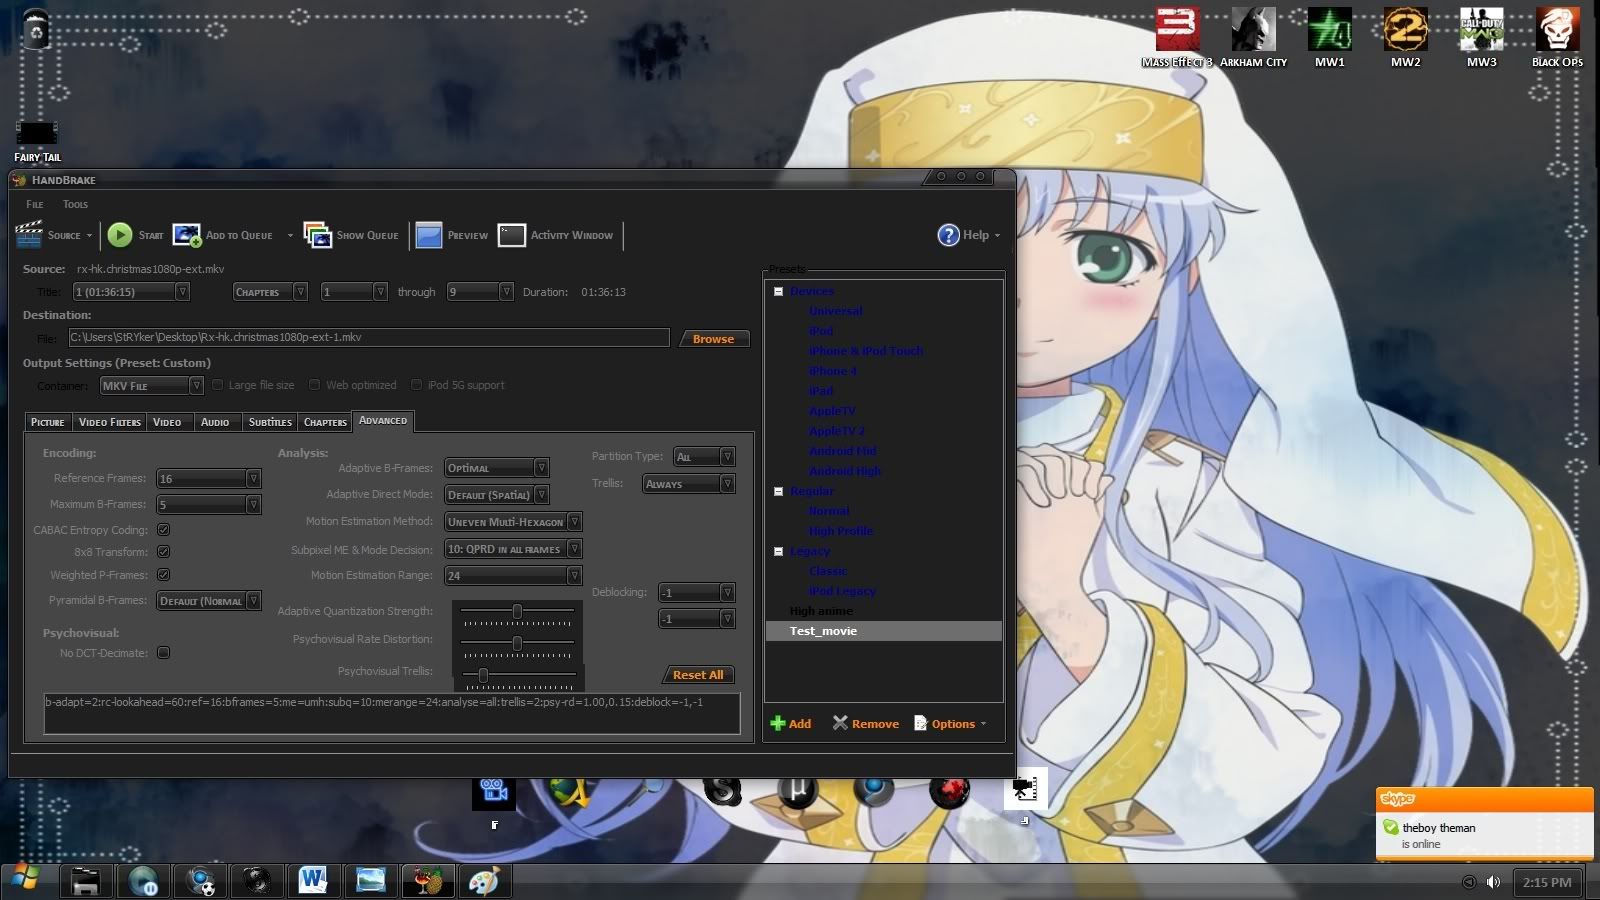
‘Reference Frames’ = 16
‘Maximum B Frames’ = 5
‘CABAC Entropy Coding’ : Checked
‘8x8 Transform’: Checked
‘Weighted P-Frames’: checked
‘Pyramidal B-Frames’: Default (Normal)
‘No DCT –Decimate’: NOT checked
‘Adaptive B-Frames’: Optimal
‘Adaptive Direct Mode’: Default (Spatial)
‘Motion Estimation Mode’: Uneven Multi-Hexagon
‘Subpixel ME & Mode Decision’: 10: QPRD in All Frames (Note: As the value is 10 this requires ‘Trellis’ to be set as Always.)
‘Motion Estimation Range’: If source as a lot of motion (Fast moving scenes, fighting) then set it to 32, Default (16) for more static movie. Set it to 24 here.
‘Adaptive Quantization Strength’: Leave it as it is.
‘Psychovisual Rate Distortion’: Again no need to change any value here.
‘Psychovisual Trellis’: Move the slider to the 0.15 mark.
‘Partition Type’: All‘Trellis’ = Always (As described above)
‘Deblocking’: Since we are re-encoding movie so change it to -1 and -1.
Look in bottom text box there will be a command ‘rc-lookahead=10’ change its value to 60. (Note: If there is no such command then simple add in the end).
If you want some more info of the settings in the ‘Advanced’ tab just hover your mouse on each settings and wait for a tool tip to appear.
Click ‘Add’ in presets pane to save the settings. Name the preset according to your liking , select ‘None’ in picture size and check ‘Save Filter Settings’
Spoiler: show
Ok all done (at last :/) now before we click ‘Start’, press the ‘Preview’ button in duration select 120 secs make sure ‘Use system default’ is selected, click on ‘Play’. This will re-encode the first 120 secs of the movie to lets us check how our output will look like. After completing it will automatically play the encoded video, see if it comes to your expectations, remember it will never be alike that 6-7 GB source. If yes then HIT ‘Start’ on top to begin encoding or press ‘Add to Queue’ if you want to process multiple encodes. After starting you will get status in bottom, for advanced encode log press ‘Activity Window’ on top.
It is recommended to have a CPU cooler before starting encoding as your processor can get really hot during the 2[SUP]nd[/SUP] pass.
As the 120 sec is mostly intro of movie so is better to check your settings with a sample provided with the movie. (If no sample then you have go with 120 sec method)
Anime Re-encoding
1. Click on ‘Source’ and select ‘Video File’ to open episode needed for re-encoding, to simplify you can also press ‘Ctrl + O’ .
2. Select ‘High Profile’ from left column. In ‘Container’ select MKV file. In ‘Picture’ tab select ‘None’ in ‘Anamorphic’ drop down box. In ‘width’ place 1280 and for ‘height’ write 600 (for reason read above) . Ok so I have changed my settings
why? cause as the source is already in true 720p, so you don't need to change it. So keep it 1280 as width and 720 as height . Spoiler: show
3. Turn every thing to OFF here too .
4. In ‘Video’ tab select ‘H.264(x264)’ as ‘Video Codec’. In ‘Framerate’ select ‘Same As Source’ and below it select ‘Varible Framerate’. OK in ‘Quality’ we got two things 1 ‘Constant Quality’ while the other is ‘Avg. Bitrate’, I will explain both.
Spoiler: show
In ‘Constant Quality’ the file size of the output file will vary but the bitrate will be constant through out the video playback. The higher the value in CRF the lesser the filesize and lesser quality and vice versa. Preferred CRF value is 24 – 28 for anime and 22 – 26 for movies.CRF is faster way of encoding as it is only 1- pass.In ‘Avg. Bitrate’ the bitrate varies depending on the video current scene e.g If a video has a lot of static scenes (less movements) then there the bitrate will be low and in action scenes (like running, gun fighting) here the bitrate is increased to favor the quality. ‘Avg. Bitrate’ or 2- pass encoding is slow as in 1st pass the video is analyzed (to calculate where it needs more bitrate and where less) and then in 2[SUP]nd[/SUP] pass the video is re-encoded.
I prefer 2-pass encoding over CRF because with it you can achieve better quality
. So select ‘Avg. Bitrate’ and write ‘450’ in text box. Select ‘2- pass Encoding’ with ‘Turbo first Pass’ selected.Spoiler: show
5. In ‘Audio’ tab click ‘Remove’ repeatedly to delete all audio queues. Below ‘Add Track’ button select desire track in drop down menu.
In ‘Audio Codec’ select ‘Vorbis’ OR ‘AAC (FAAC)’.If you plan to watch anime on your PC only then choose Vorbis otherwise . ‘Mixdown’ can be ‘Mono’ or’ Stereo’ ( If source has 6 CH. FLAC source you need to select mono as Mixdown and bitrate should be 48 Kbps).
In ‘Bitrate’ select ‘160’. Now click ‘Add Track’ the audio will now appear in queue list. If anime contains multi audio (like both Japanese + English) then you will have to repeat the above mentioned steps for each audio (the first audio in queue will be default audio).
Spoiler: show
6. Go to ‘Subtitles’ tab, select the subtitle under ‘Add’ (here it is English SSA), select ‘Burned In’ checkbox for hardsubbed or’ Default’ for softsubbed.
Spoiler: show
Hardsubbed: The subtitles are permanent part of the video so you cannot turn then off or remove them.
Softsubbed: The subtitles are just part of the video like a text display that can easily be turned off or ON and these kinds of subtitles can also be extracted.
Softsubbed: The subtitles are just part of the video like a text display that can easily be turned off or ON and these kinds of subtitles can also be extracted.
I use default i.e. soft subs.
Spoiler: show
7. Come straight to ‘Advanced’ tab, here we will set the perimeters that I talked above. Here change the value of following as stated below.
Spoiler: show
‘Reference Frames’ = 16
‘Maximum B Frames’ = 8
‘CABAC Entropy Coding’ : Checked
‘8x8 Transform’: Checked
‘Weighted P-Frames’: checked
‘Pyramidal B-Frames’: Default (Normal)
‘No DCT –Decimate’: NOT checked
‘Adaptive B-Frames’: Optimal
‘Adaptive Direct Mode’: Default (Spatial)
‘Motion Estimation Mode’: Uneven Multi-Hexagon
‘Subpixel ME & Mode Decision’: 10: QPRD in All Frames (Note: As the value is 10 this requires ‘Trellis’ to be set as Always).
‘Motion Estimation Range’: If source as a lot of motion (Fast moving scenes, fighting) then set it to 24 otherwise Default (16) is also fine.
‘Adaptive Quantization Strength’: Move the slider to left and you will see the value changing in bottom text box. Set it to 0.6.
‘Psychovisual Rate Distortion’: Again move the slider and set the value to 0.40, 0.00.
‘Psychovisual Trellis’: Don’t touch it, let it stay on 0.00.
‘Partition Type’: All.
‘Trellis’ = Always (As described above)
‘Deblocking’: Since we are re-encoding anime so set it to 1 and 1.
Look in bottom text box there will be a command ‘rc-lookahead=10’ change its value to 60. (Note: If there is no such command then simple add in the end).
If you want some more info of the settings in the ‘Advanced’ tab just hover your mouse on each settings and wait for a tool tip to appear.
Click ‘Add’ in presets pane to save the settings. Name the preset according to your liking
, select ‘None’ in picture size and check ‘Save Filter Settings’Spoiler: show
All right we are all set, now click ‘Start’ to start the encoding or press ‘Add to Queue’ if you want to process multiple encodes. After starting you will get status in bottom, for advanced encode log press ‘Activity Window’ on top.
It is recommended to have a CPU cooler before starting encoding as your processor can get really hot during the 2[SUP]nd[/SUP] pass.
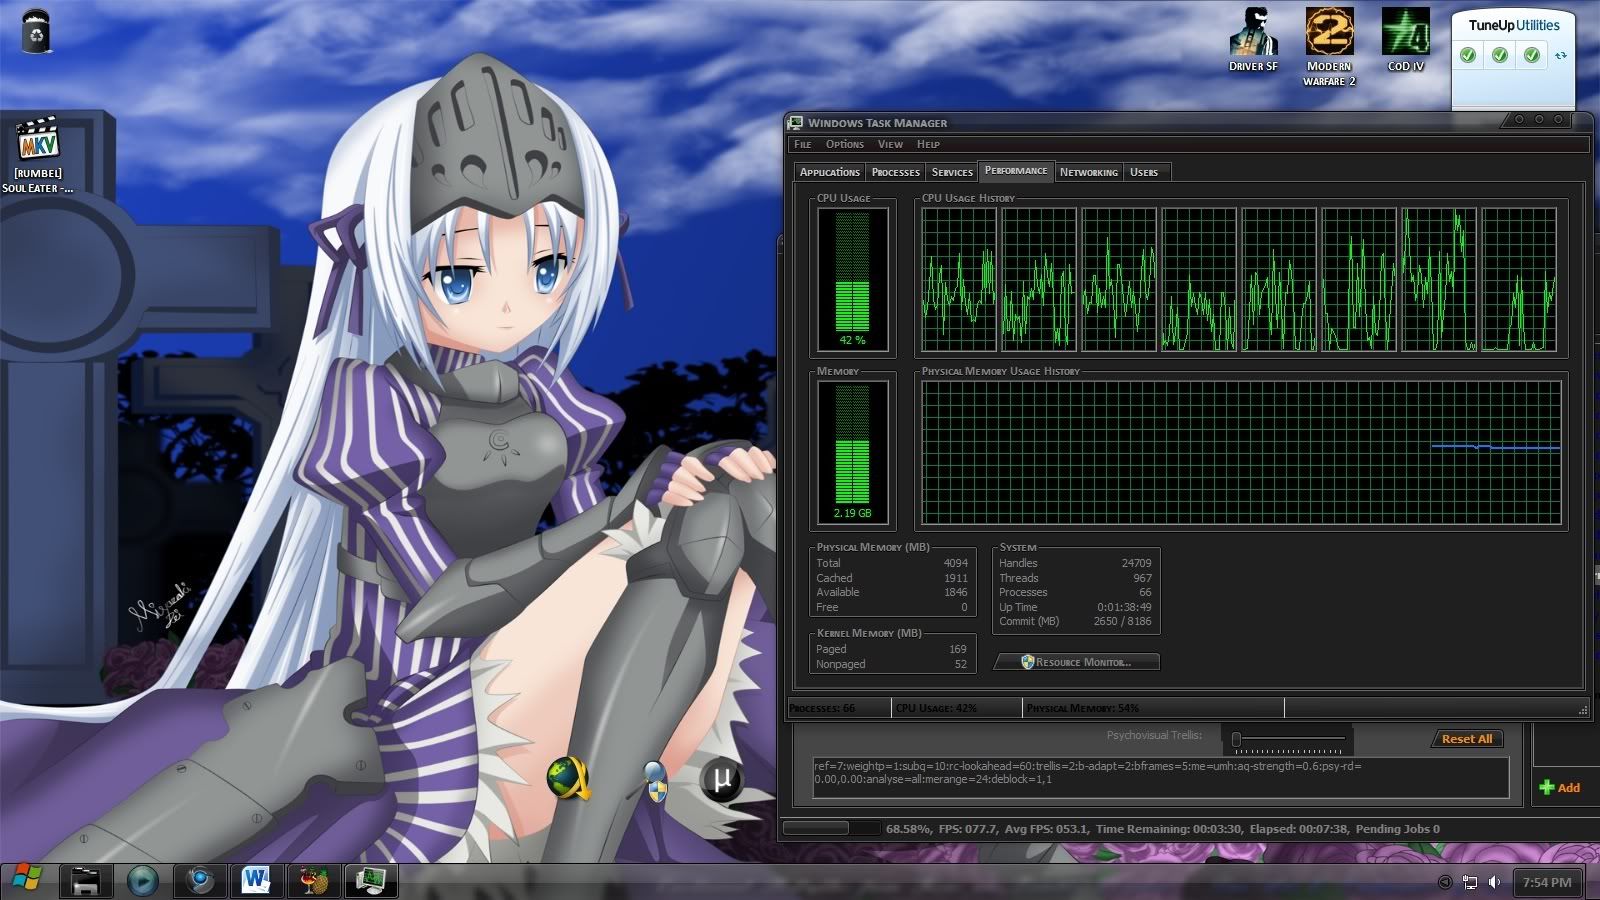
Not much load of processor during 1[SUP]st[/SUP] pass.
Spoiler: show
Now for real encoding, Le 2[SUP]nd[/SUP] PASS
Spoiler: show
After 25 minutes the video is encoded and here are the output properties.
The source was 344 MB (added below) while the output is 88 MB
.Spoiler: show
Ok this ends the first part of guide i.e
Compress the data to reduce space. (300MB movies or Mini-Encodes)
Stay Tuned for the other part . will be delayed due to extreme load shedding :/ .
Last edited: